Shrimp and Veggie Mei Fun

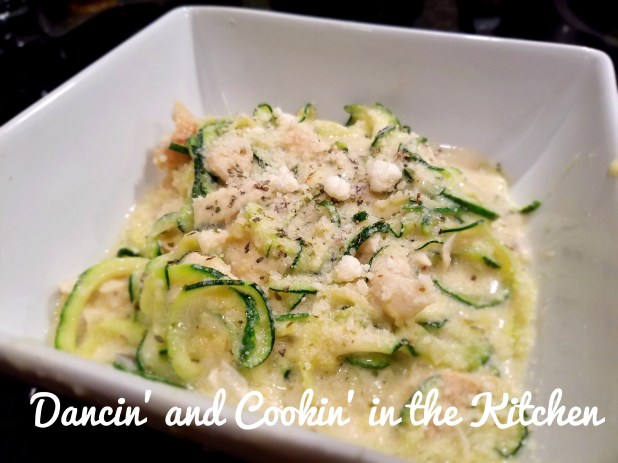
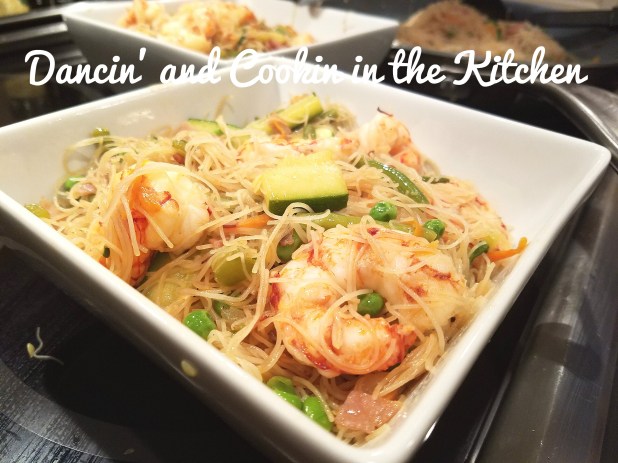
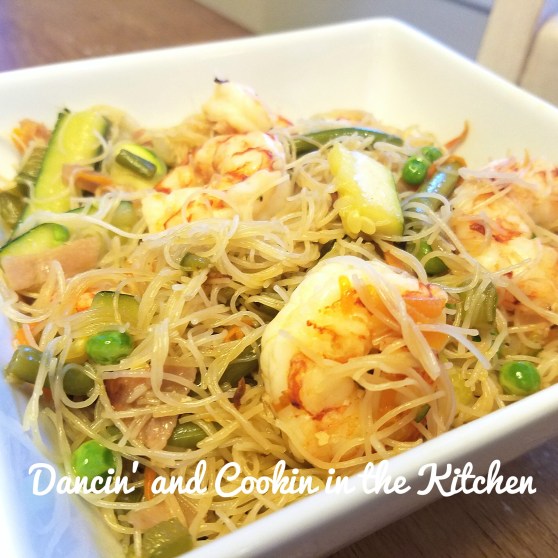
Since choosing to try out the “gluten free” fad in order to stay healthy and fit… it has really limited my choices when we eat at a chinese food restaurant. Luckily I am not gluten “intolerant”, and I do not have celiacs disease. I cannot imagine how hard that would be!! It’s mainly a choice and I do have a bit of cheats here and there. One thing I learned is that there is wheat in some soy sauce! I also learned that some chinese restaurants do use flour to thicken some of their sauces! With trying to be “good” on my diet I was pretty choosy about what I would order. I have found a new favorite though!! Mei Fun!! It is similar to chow mein, but it is made with gluten free rice noodles and loaded with yummy vegetables! It’s actually one of the less expensive dishes on the menu as well! WIN! Like anything though, I like to attempt to make it at home to see if I can do it. Always worth trying I say! (By the way… I did attempt egg drop soup for my husband. I’ve been told to stop trying, it’s not good when I make it. HAHAHAHAHA! So… I can NOT make egg drop soup. If anyone has a tried and true recipe without any food dyes, etc. please let me know.)

1474299171615.jpg

Ingredients:

1. 3 TB olive oil
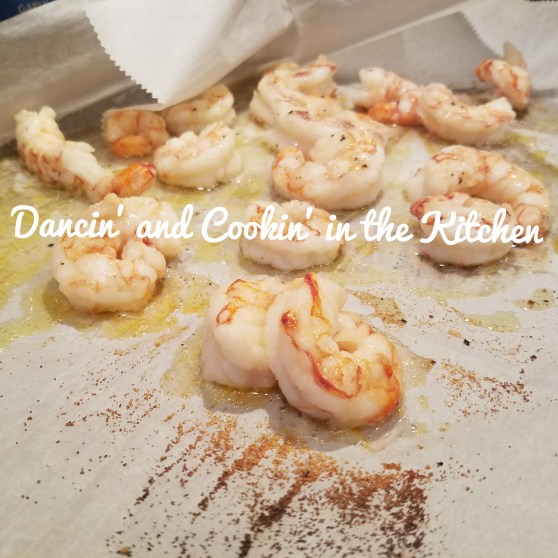
2. 1/2 pound medium/jumbo shrimp
3. 3-4 oz. sliced deli ham chopped
4. 1/2 green bell pepper diced
5. 1 tsp minced garlic
6. 1 small zucchini sliced thin and cut up
7. 5-6 baby carrots julienned (you can also use 1-2 large carrots)
8. 8.2 oz. rice noodles (I used these: Vermicelli Rice Noodles), soaked in warm water for 30 minutes to an hour (use kitchen shears to cut the noodles to about a 10-inch length so they don’t bunch up when stir-frying)
9. 1 tsp garlic powder
10. 1   – 2 TB dry white wine
11. 1 tablespoon seasoned rice vinegar
12. 1 teaspoon soy sauce (gluten free options available, or try Aminos!!)
13. 2 tsp sesame oil
14. 1/2 cup frozen peas
15. 1 cup frozen french green beans cut to shorter bite size pieces
16. 1/4 sweet yellow onion diced
17. Salt and pepper to taste

****Be sure to start soaking the noodles about an hour before you’re ready to start preparing the rest of the dish.

1474299245598.jpg

Instructions
  1. Start by preheating your oven to 400 degrees F. At the same time, place your noodles in a large bowl of warm water and soak.
  2. Place 1/2 pound jumbo shrimp on lined baking sheet and drizzle with olive oil. Sprinkle with garlic powder and salt and pepper. Bake for 12-15 min from frozen.
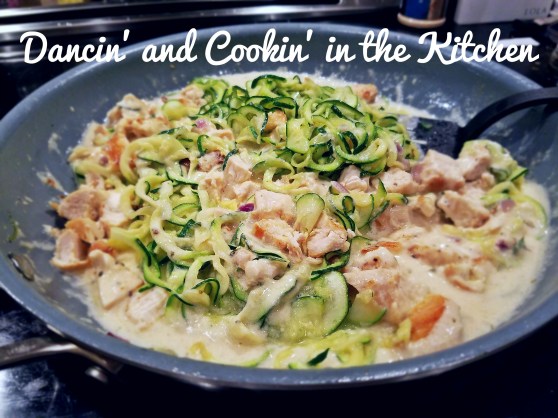
  3. Heat 2 tablespoons olive oil in your wok until it just starts to smoke. Add the ham and stir-fry for about 20 seconds. Add the onion, garlic, and pepper,  carrots, green beans and zucchini and stir-fry for another minute. The heat should still be high, and you should be stirring constantly. You want enough sizzle to produce that “wok hay” (literally translated to: ‘breath of the wok’) flavor. (this description taken from : Mei Fun Noodles )
  4. Add the soaked noodles and give everything a good stir. Toss in the shrimp and stir-fry until the noodles are heated through–about 3-5 minutes.
  5. Add the dry white wine, rice vinegar, soy sauce, and sesame oil. Mix well. If your noodles begin to stick, the skillet is probably not hot enough. Just use your spatula and make sure to scrape anything off the bottom of the wok so it doesn’t burn!
  6. Finish with the frozen peas. I toss them in to JUST barely heat them so they will “pop” when you bite into the baby peas. Serve! If you want a bit of spice, you can add sriracha or some pepper flakes to the top.

This will possibly be replacing my take-out! It was SOOO good!!!

1474299328173.jpg

If you find yourself craving some take-out, but want to be a bit careful, give this one  a try! It’s delicious, not greasy, gluten-free and you’ll want it over and over again!

1474299435907.jpg

And now, for the song of the day:

Zucchini and Chicken Alfredo

GUESS WHAT I GOT!?!?!?! A veggie spiralizer! My friend had a pampered chef party the other week and I saw that they have a spiralizer! Now… I’m mildly obsessed with all things Pampered Chef. It’s a problem… but I FORCED my friend to have a party, just so she could partially benefit from my obsession and need to order this spiralizer. So, because she’s a good friend, she hosted a party and I got it! YAY!

I’ve made this dish 2 times. Once by using the largest side of my cheese grader, and once by using my spiralizer. I did like both, but my favorite version was with the spiralizer. It was just FUN! It made the zucchini the size and texture of noodles. You can make a still delicious version with your cheese grater though if you don’t want to/don’t have the spiralizer.

My husband and daughter thought this was a WINNER!!! My sweet son couldn’t try it because it’s chock full of cheese and dairy… but I’m sure if he could, he would’ve loved it! Who doesn’t love alfredo?! And if you’re gonna splurge, you may as well splurge with veggies so you don’t feel QUITE as guilty!!

My recipe is adapted from this one: Zucchini Alfredo

1474297335689.jpg

INGREDIENTS:

  • 5 tablespoons unsalted butter, divided
  • 4 chicken tenderloins sauteed in a skillet with olive oil, salt and pepper for about 4-5 min. per side (from frozen) and then set aside to rest.
  • 2 large zucchini (or 3 medium to small), spiralized* OR shredded with the LARGE side of a cheese grater
  • 1 tsp minced garlic
  • 2 tablespoons all-purpose flour (or gluten free flour alternative for a thickener)
  • 1 1/2 cups half and half OR 2% milk (at the least amount of fat. The cheese won’t bind with the milk to make the creamy sauce if you use skim or rice milk)
  • 1/2 teaspoon dried oregano
  • 1/4 fresh black pepper
  • 1/2 tsp dried italian seasoning
  • 1/4 cup freshly grated Parmesan cheese (I prefer “Shredded” parmesan cheese over grated. I had run out… but the taset is WAY better, creamier and cheesier)
  • Kosher salt to taste
  • 2 tablespoons chopped fresh parsley leaves


DIRECTIONS:

  1. As mentioned above, sautee chicken (Unless you’re using leftover rotisserie chicken) and set aside on a cutting board. Let rest BEFORE you cut up.
  2. Melt 1 tablespoon butter in a saucepan over medium heat. Sautee onions until translucent. Add zucchini and cook, stirring occasionally, until tender and heated through, about 3-5 minutes; set aside.
  3. Melt remaining 2 tablespoons butter in the saucepan. Add garlic, whisk in flour until lightly browned, about 1 minute.
  4. Gradually whisk in cream, italian seasoning and oregano. Cook, whisking constantly, until incorporated, about 1-2 minutes. Stir in Parmesan until slightly thickened, about 1-2 minutes. If the mixture is too thick, add more milk as needed; season with salt and pepper, to taste. (I am pretty generous with the black pepper. I think it makes the alfredo pretty and delicious.)
  5. Stir in zucchini  and the now chopped chicken tenderloins, and gently toss to combine.
  6. Serve immediately, garnished with parsley and a bit more shredded parmesan cheese, if desired.

1474297167820.jpg

And SERIOUSLY enjoy! You’ll be glad you made this one!!!

1474297232112.jpg

And now, for the song of the day:

I can’t help singing to this song every time I hear it!!!

Baked – Potato Nachos

A couple of weeks ago my brother was over and I was trying to think of something easy and filling to make. I know both him AND my hubby LOVE potatoes and bacon. Then again, there are few that DON’T love that combination. Am I right?! So I cut up a few potatoes and just kept adding stuff I had in my fridge to the pan and VOILA! DINNER!

You want to know something weird though? My kids don’t love potatoes. The only type of potatoes they like are french fries. It’s a no to mashed potatoes, tater tots, hash browns, etc. Aren’t they weird. Who doesn’t love potatoes in all shapes, sizes and forms? MY CHILDREN. It’s like I don’t know who they are! They have some serious training to undergo. We’ve gotta work on them. Hopefully by Thanksgiving their MAJOR problem and pickiness of potatoes will be transformed. I will let you know. 🙂

So…. here is the HIT OF THE NIGHT with the adults. The kids had sandwiches. So THERE.

1473791121850.jpg

Ingredients:

  1. 6-10 slices of precooked bacon (I used black label hormel pre-cooked. You can also “pre-cook your own in the oven and then freeze what you don’t use and pull out as needed! Great trick for bacon cravings!!)
  2. 4-5 Yukon gold potatoes scrubbed and diced into bite size pieces (You can also buy the “pre chopped” homestyle fries from the frozen section of the grocery store for an easy option.
  3. 4 chicken tenderloins cooked (I sauteed with 1 TB olive oil, salt and pepper) and diced. You can also use leftover rotisserie chicken. That would be EASY and TASTY!
  4. 1 teaspoon kosher salt
  5. 2-3 TB olive oil
  6. 3/4 teaspoon freshly ground black pepper
  7. 2 sweet mini red bell peppers diced
  8. 2 tsp chili powder
  9. 1 tsp garlic powder
  10. 1/2 tsp cumin
  11. 1 avocado (for topping)
  12. Greek yogurt (for topping)
  13. Salsa (also for topping)
  14. 1 1/2 cups shredded cheddar or Mexican blend shredded cheeses
  15. 3 green onions, sliced thin
  16. OPTIONAL: sprinkle with red chili flakes


Directions:

Bacon: Microwave the pre-cooked bacon on a plate with paper towel as directed on packaging. You can also cook raw bacon in the oven as directed. I just go for easy and quick bacon on nights like this!

Potatoes: Preheat oven to 350 degrees. Scrub and diced the potatoes into bite size pieces. ( like the peel to still be on the potatoes. You can peel if you’d like to). Drizzle the potatoes with olive oil and sprinkle with salt and pepper, cumin, garlic powder, and chili powder on the pan and stir around a bit. Spread the potatoes out in a single layer and bake for 20 minutes, stir well and bake an additional 15 – 20 minutes or until soft. Stir again and if needed bake another 10-15 min.

(If you need to saute chicken because you do not have leftover rotisserie chicken, do it NOW while potatoes are baking. Then set aside and rest once cooked. Dice right before you put onto the potatoes.)

Chop the bacon into small pieces. Remove the potatoes from the oven, stir again and sprinkle generously with shredded cheese, peppers, chicken, and chopped bacon. Return the tray to the oven and bake an additional 2-3 minutes, until the cheese has melted. Top with sliced green onions, avocado and greek yogurt (or sour cream) just before serving. Enjoy!

1473790932174.jpg

And now, for the song of the day:

Mexi-Lime-Cilantro Rice with Shrimp

Sometimes I run low on ingredients. I know it seems weird if you’ve even seen my shopping lists… but I only go shopping every 2 weeks (Unless I poorly plan and run out of an essential like butter or milk). So, towards the end of the two weeks, if I have been cooking outside of my meal plan… I don’t always have all of the ingredients for my meal plan! AH! That happened last week and I had to go scrounging on pinterest for a recipe that had shrimp and rice… that wasn’t something I’d made a million times. I found this recipe: Cilantro Lime Black Bean Rice and Shrimp . I of course made my alterations and made my own recipe out of it, especially because I have a food blog… you gotta change at least 3 things to make it your own! The plus side? It took me less than 30 minutes to make! Give this one a try, and ENJOY! You can even make it less or more spicy, to your taste. Throw some jalapenos in there if you want!

wp-1474292735959.jpg

Ingredients

Shrimp
    • 2 tablespoons olive oil
    • 1 pound raw, frozen (wild caught) shrimp, peeled and deveined
    • 1/2 tsp garlic powder
    • 1/4 teaspoon salt
    • 1/4 fresh cracked pepper
Rice
  • 1 cup of water
  • 1/2 cup uncooked basmati rice (depending on how many people you’re going to serve. Adjust according to amount of people you’re cooking for. This is for 4 people. Remember, if you increase amount of rice, also increase amount of water!! 2 parts water to 1 part rice)
  • 1/4 teaspoon salt
  • 2 tablespoons lime juice, freshly squeezed + extra
  • 1 can (15 oz) black beans, rinsed, drained
  • 1/2 cup fresh cilantro, chopped + extra

Remaining Ingredients

  • 1/2 cup frozen corn
  • 1 ripe avocado diced
  • 1/2 can fire roasted diced tomatoes with green chilis
  • 1/4 chopped sweet onion
  • 1/4 tsp minced garlic
  • diced bell pepper (I used red)
  • 1 TB butter


Instructions

Rice
  1. Start this first!! Rinse the rice well either in a bowl or in a mesh colander until the water runs clear. Then put into a rice cooker, or a sauce pan and cook according to directions on package. Once rice is done and completely cooked, pour into a mixing bowl.
  2. Mix in the lime juice, salt and cilantro and set aside.
Shrimp
    1. Preheat oven to 400 degrees F.
    2. Line pan with parchment paper or aluminum foil.
    3. Drizzle shrimp with olive oil and sprinkle all of the seasonings evenly over the top.
    4. Dollop the butter over the tops of some of the shrimp.
    5. Bake at 400 for 12-15 minutes or until cooked through, circled up tightly and no longer transparent in the middle. (Depending on size of shrimp. I usually use medium to jumbo shrimp).

Rice Skillet Mixture

  1. Add the butter, black beans, onions, diced bell pepepr, and corn into the skillet. Sautee until the onions are translucent and add the salt, pepper, garlic and the 1/2 can of diced tomatoes with green chilis. Pour in the cilantro lime rice and stir to properly combine. Sprinkle in the fresh cilantro and top with the shrimp once cooked. Garnish with more cilantro and a bit of avocado!

ENJOY!!!!

wp-1474292727200.jpg


And now, for the song of the day:

Zucchini “Lasagna” Roll-Ups

Since going low-carb I’ve really missed some classics. I do love Italian food, especially lasagna! I’ve been wondering a good way to make it, without just using “gluten free” pasta, or corn pasta, or whatever. I found this recipe on pinterest: Zucchini Lasagna Rolls . I, of course, changed a few things and made my own version… but it was SO good and satisfying!!! Plus, you get  your veggies, meat AND dairy all in 1 meal!!! Low carb, but I would save some calories for this one… lots of DELICIOUS cheese in this one!!

wp-1473789485309.jpg

Ingredients:
Cheesy Filling
    • 8 ounces ricotta cheese (I used 2%)
    • 4 ounces low fat cottage cheese
    • 3 tablespoons shredded fresh parmesan cheese
    • 2 tablespoons fresh flat leaf parsley roughly chopped
    • 1 tablespoon fresh basil roughly chopped
    • 1/2 teaspoon kosher salt
    • 1/4 teaspoon minced garlic
    • 1 tsp italian seasoning
    • 1/4 tsp oregano
    • Black pepper to taste
Other Ingredients:
  • 3 large zucchini cut lengthwise into 8 (1/4 inch thick) slices
  • 1 lb lean (I used grass fed) ground beef
  • 1 jar marinara sauce (I used Newman’s Own… use your favorite!)
  • 3/4 to  1 cup shredded mozzarella


Instructions

Cheesy Ricotta Filling
    1. Add all of the ingredients into a small bowl and stir until well blended.
    2. Cover and refrigerate until ready to use.
Grilled Zucchini
    1. Heat a grill or grill pan to medium high heat. (Lightly salt grill pan if you use one)
    2. While the grill is heating, slice the zucchini lengthwise into 1/4 inch thick planks. (Try to get no thicker than this, and try to get all similar. Use a mandolin if you have one)
    3. Brush with extra virgin olive oil (I used some garlic infused olive oil!! YUM!) on both sides of the zucchini planks, then sprinkle with salt and pepper.
    4. Place the zucchini on the hot grill and cook for about 2 minutes on each side or until the zucchini is soft and pliable. (So that when you roll them they don’t break… but you also don’t want them mushy)
    5. Remove from the grill and cool on a plate with a paper towel (to catch excess liquid) until they can be handled.

Meat Sauce
1. Brown your 1 lb ground beef in a large skillet until cooked through.
2. Drain and remove fat from pan.
3. Add jar of (or homemade) marinara sauce and let simmer on LOW.
4. Remove from heat and set aside.

Assembling the Zucchini Lasagna Rolls
  1. Preheat oven to 375 degrees.
  2. Line a 9 x 15 (Or similar) casserole dish with parchment paper (or spray with cooking spray).
  3. Spread a 1/4 cup of the meat sauce evenly over the bottom of the dish.
  4. Blot any excess liquid off of the cooled planks of zucchini with paper towels.
  5. Spoon about a tablespoon of the ricotta filling onto one side of the zucchini and spread it into an even layer.
  6. Roll up the zucchini and place them seam side down in the casserole dish.
  7. Top the zucchini rolls with the remaining meat sauce , shredded mozzarella cheese, some parmesan, fresh black pepper and some chopped basil.
  8. Bake in the oven for 20-25 minutes or until the cheese is melted and bubbly.

wp-1473789497361.jpg

And… THIS is what it looks like!!! It will be a hit! Even the kids loved it!!! YUM!

wp-1473789480770.jpg

And now, for the song of the day: I’m sorry… it’s seriously my FAVORITE song right now!!!!!