Homemade Wheat Sandwich Bread (with a #vegan option!)

So, we spend a lot of money on bread around our house. Like, it’s ridiculous. Because of my son with food allergies, I am very picky about what brand and what ingredients are in the bread. We have been buying bread from Trader Joes for about $4.00 per loaf (or more… can’t quite remember) because I like the ingredients, and it doesn’t have any allergens in it. But… that much money per loaf and I buy 6 loaves of bread every 2 weeks… that’s a LOT of money for bread! So, I’ve decided I need to make more of my own bread. My mom has a bread machine that I can use… but I don’t like my bread BAKED in the bread machine. So, I make the dough in the bread machine, and then bake the bread in the oven. This recipe came out PERFECT! It’s got a nice crispy crust with a soft and slightly doughy inside… DELICIOUS! I don’t want to buy bread again! My mom also had some FRESHLY GROUND wheat flour. Like, not store bought… she had Wheat Berries, ground them in her Grain Mill, and gave it to me! WHAT?! Yes!!!!! Freshest you can get! I used half of this fresh flour, and half of the all purpose flour (I use Lily Flour…. I also have used King Arthur).

wpid-1432126065429.jpg

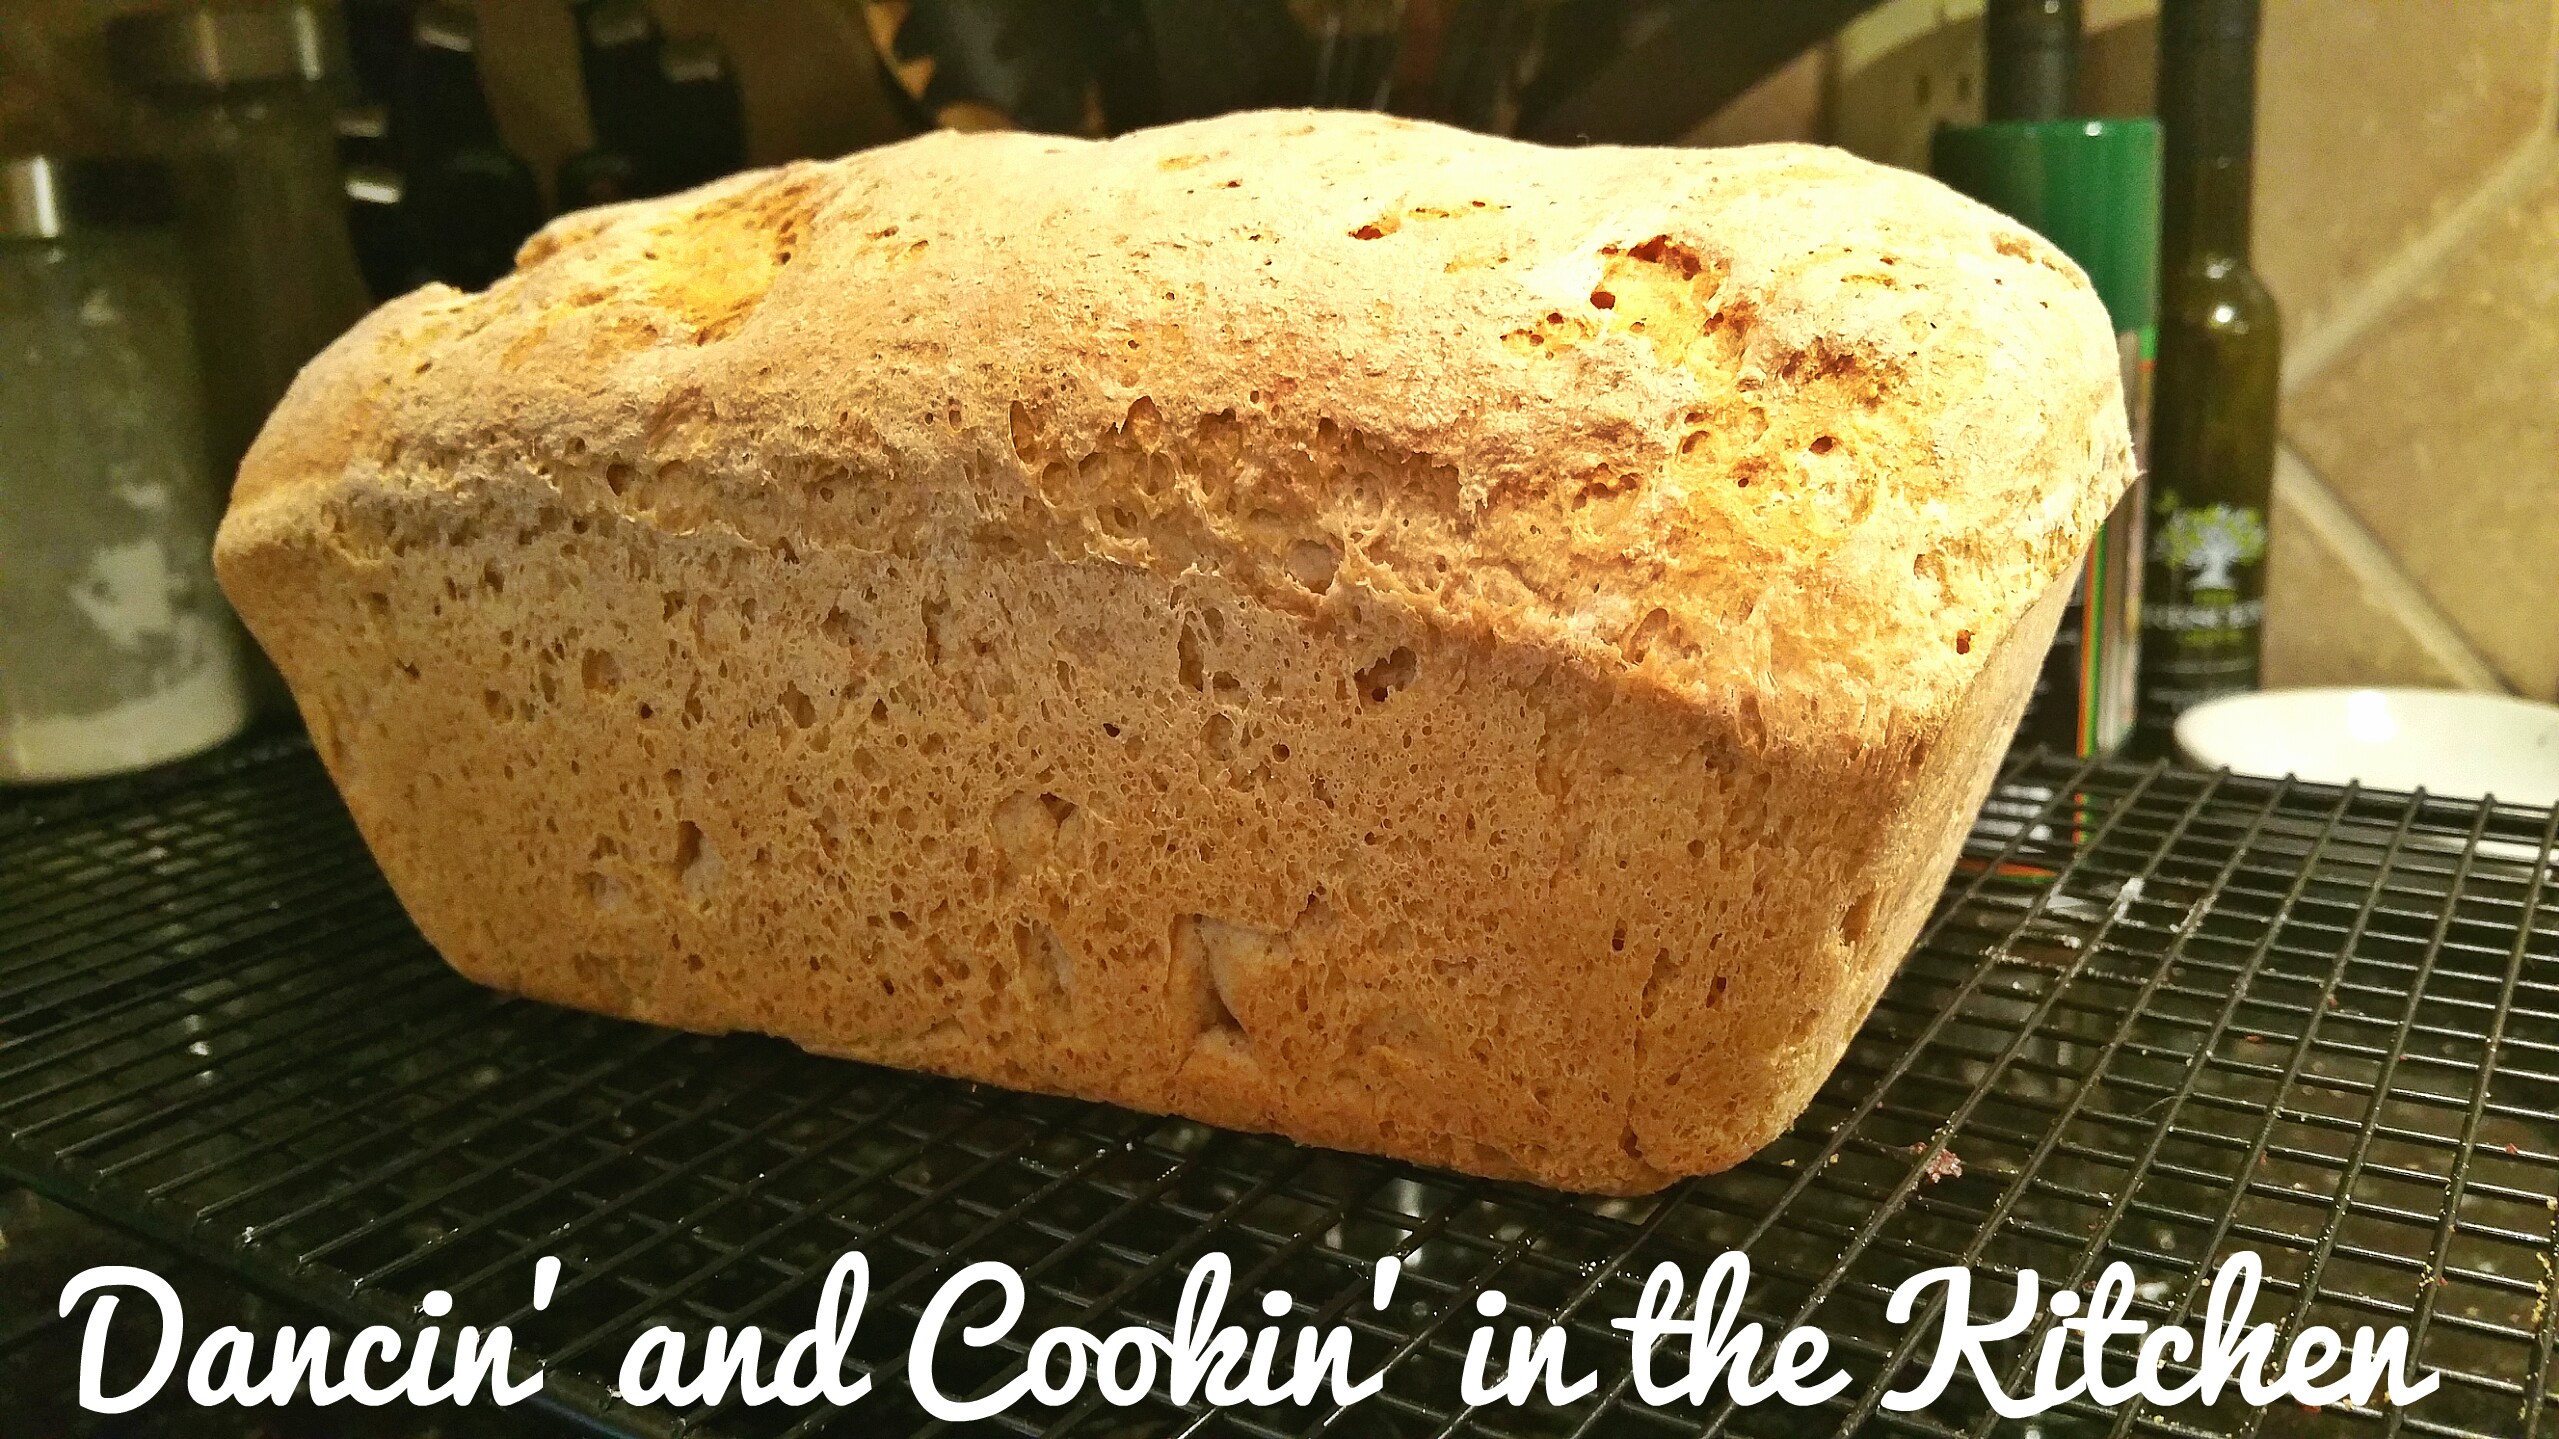
Doesn’t that look delicious!!??

For 1 loaf, so double for a batch of 2.

Whole Wheat Bread

Ingredients

1 1/4 cup warm water (NOT hot! You don’t want to “kill” the yeast)
2 tsp pure cane sugar (organic is preferred)
2 tsp fresh squeezed lemon juice
2 TB local honey
2 tablespoons butter , melted (you can use Earth Balance for the VEGAN option!)
3/4 tsp kosher sea salt
1 1/2 cups whole wheat flour
1 1/2 cups unbleached all-purpose flour, plus possible extra White Lily All Purpose Flour

3/4 TB bread machine yeast

wpid-1432125904391.jpg

IF you have a bread maker this will be quite easy! If not… BORROW ONE!! HA! It just makes it soo much easier! If you WANT one, check out this awesome and ON SALE breadmaker: Cuisinart Breadmaker

Load your bread maker in the order the ingredients are listed. Wet ingredients first, and ending with the bread machine yeast. Then, set to the DOUGH cycle. Do NOT select a bread cycle. You want dough only. Mine was a 1 hour and 20 minute cycle. When the bread machine is kneading the dough, I watch it to make sure it’s only slightly sticky, but still is being kneaded around by the machine and not sticking to one side of the pan. If needed add 1 TB of all purpose flour at a time until it’s just SLIGHTLY sticky… but not too dry! If it’s too dry, add 1 tsp of water at a time. Get a bread pan (glass or aluminum, didn’t matter… I tried both) and grease it either with a bit of butter, or cooking spray and set the bread pan aside.

Once the timer goes off and your dough is done, butter up your hands… or flour them… 🙂 … so that the dough doesn’t stick to your hands when you take it out. Remove the dough (it will deflate, that’s fine!) and make sure the paddle of the bread machine does not stay in the dough! Kind of knead it down a bit, and shape into a rounded rectangle. Place into greased bread pan and then set a damp kitchen towel over top and allow to rise for 30 minutes. At this time, preheat your oven to 350 degrees F.

wpid-1432125953735.jpg

wpid-1432125990298.jpg

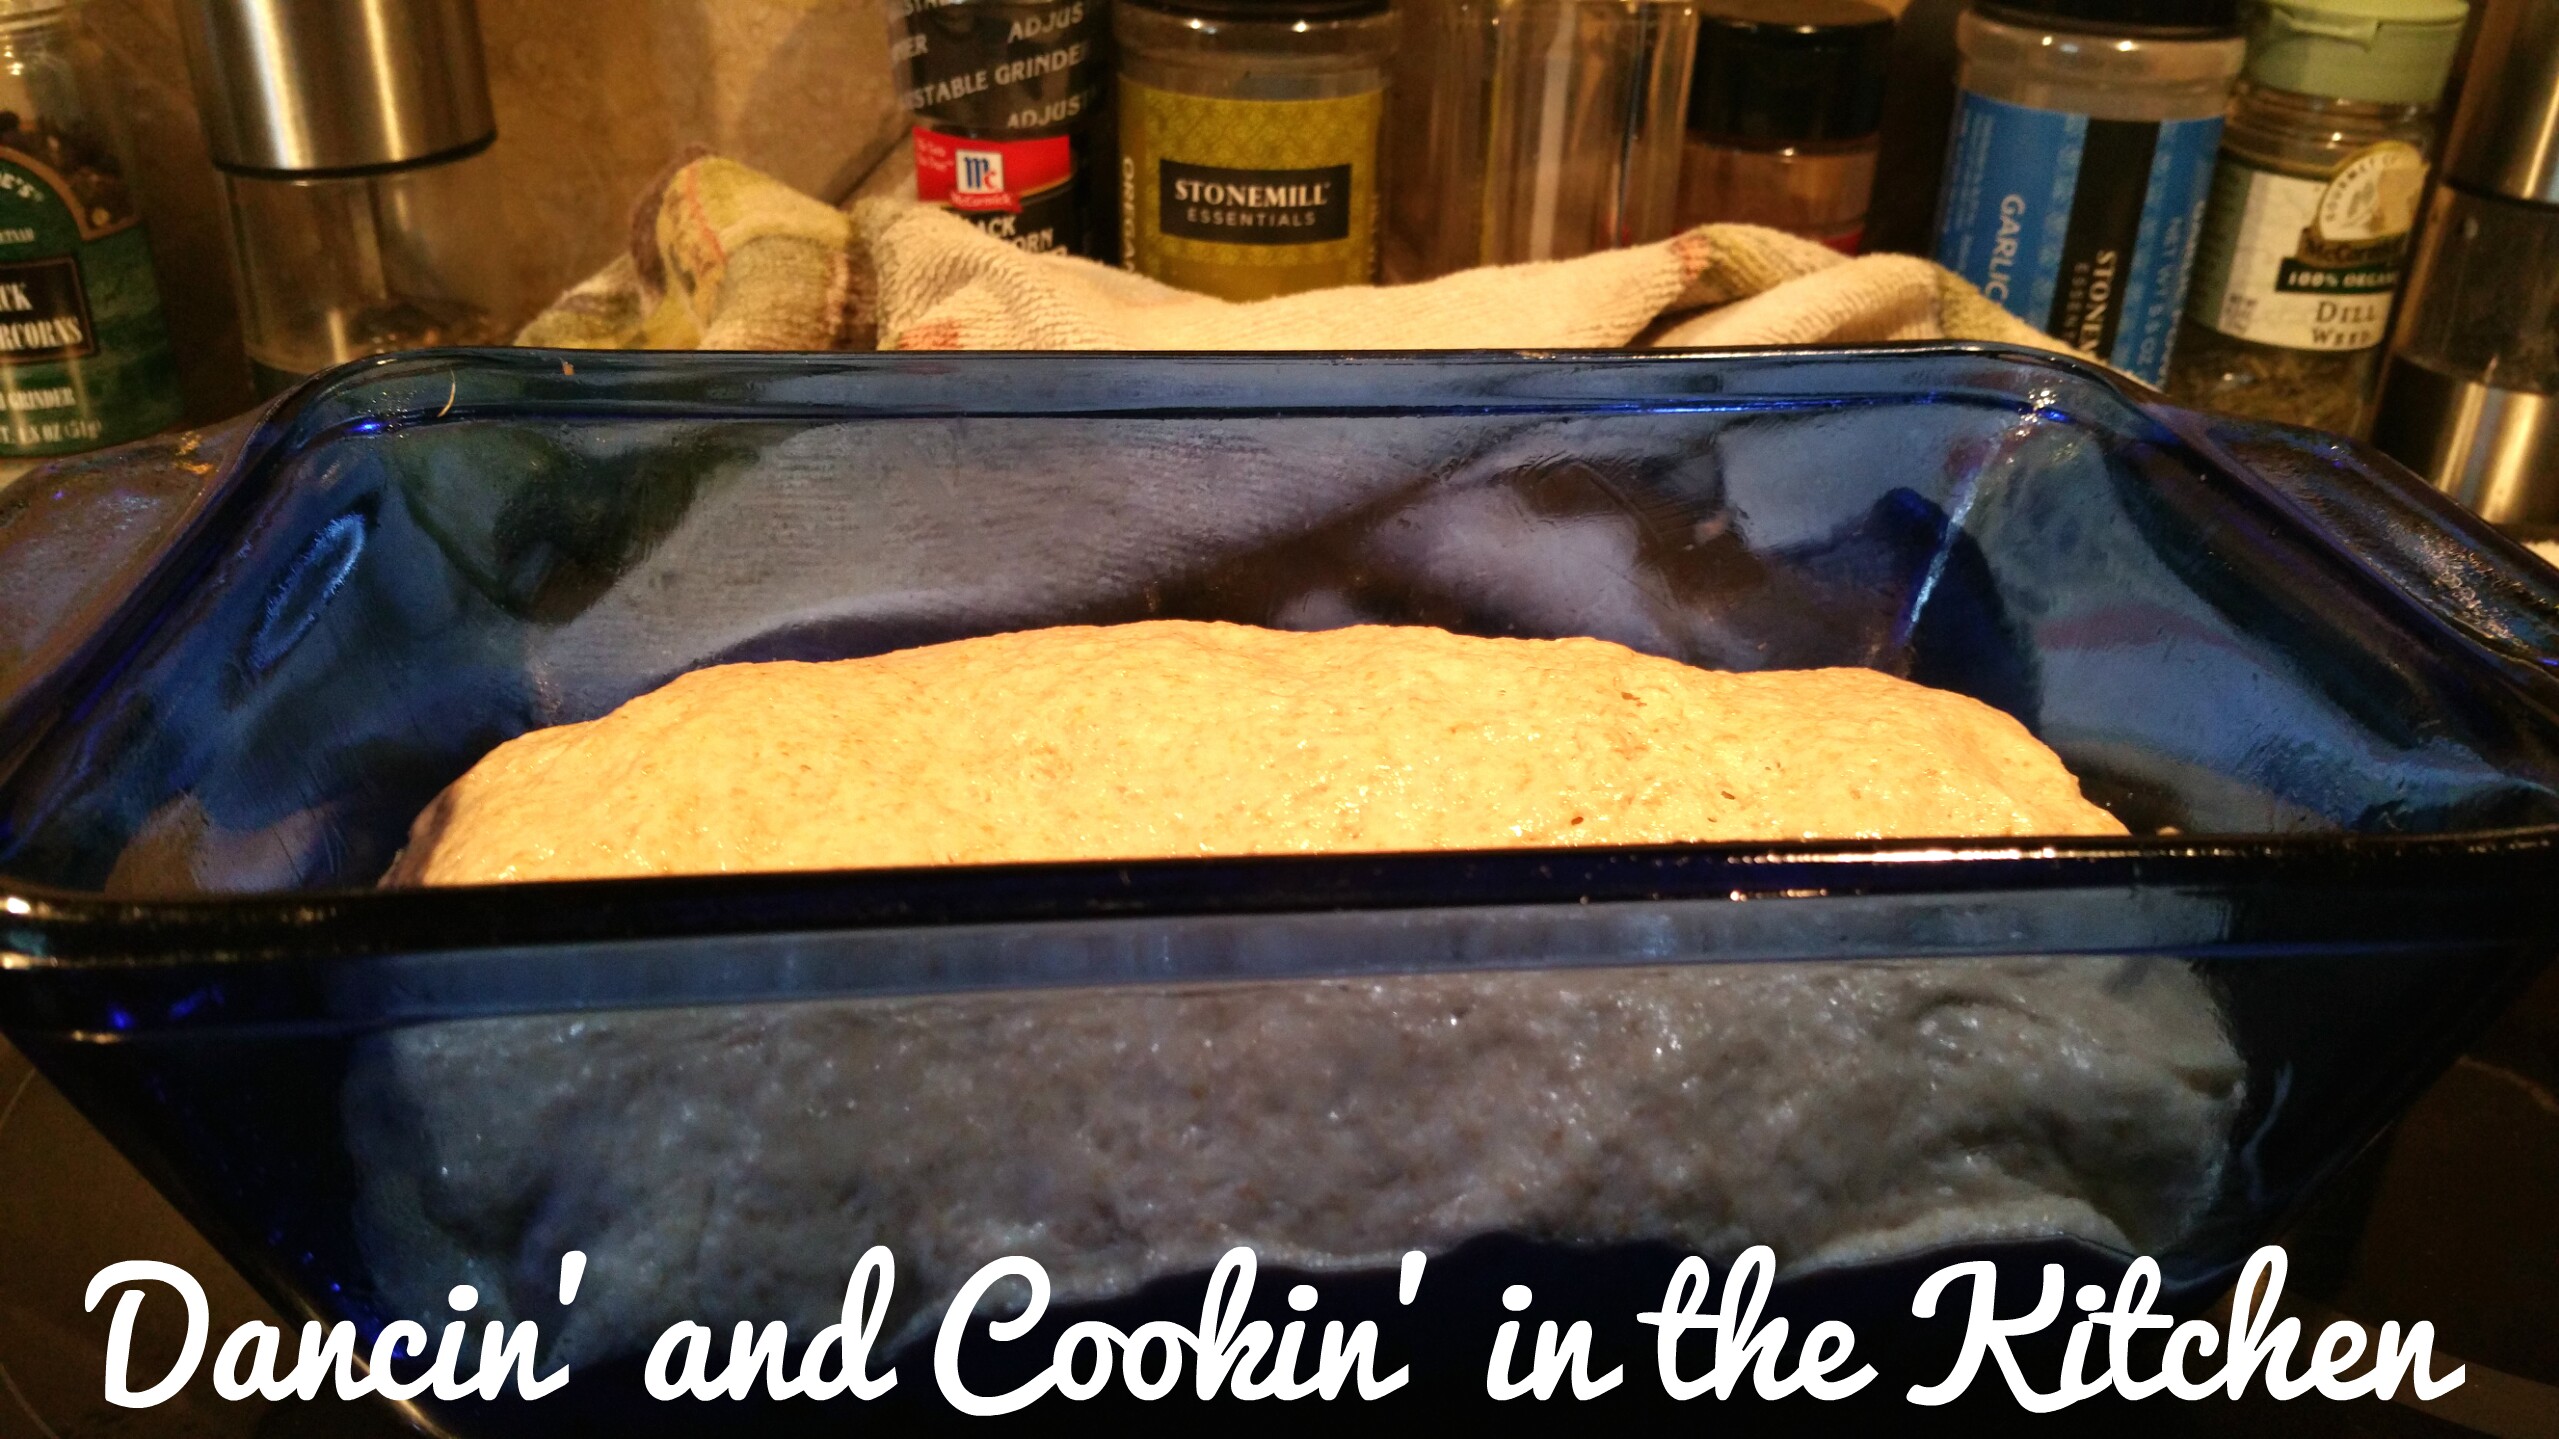
After 30 minutes, the bread dough should have doubled in size. Remove the towel, and place into the preheated oven and bake at 350 for 30 minutes. It should be golden brown with a nice crispy crust and chewy moist bread inside!

I cut it right away and me and my 2 kids ate a nice thick slice just dripping in melted butter… OH MAN!! It was DELICIOUS!!!

If you would like some homemade bread… give this one a try! It’s the best recipe I have ever made for homemade sandwich bread! And believe me, I’ve tried MANY!

wpid-1432126120745.jpg

And now, for the quote of the day:

If the world were to come to an end today and all of the people who believed in the Lord our God as their Savior were taken to Heaven to be with Him for eternity… do you know for sure if you would be with them?!

Revelation 21:4- the incredible hope and promise that can only Jesus Christ can provide!!!

Cajun Seared Salmon topped with a Simple Guacamole

I always forget how simple and easy fish is to make. I just always have to remember to thaw it properly in enough time for dinner! Ha! Luckily, yesterday, I remembered to put the frozen salmon into the fridge to slowly thaw the fish! I then ran it under WARM (not hot) water just before I cooked it while it was still in the vacuum sealed pack… just to finish the thawing. Once that was done… Dinner really took 20 minutes. Start to finish. How lovely is that?! Even if you work full time and need something quick to eat when you come home, this is a great answer! Serve this over a bit of rice, orzo pasta…. with some chips or… as is! I ate this with a few corn chips, and it was the perfect and filling dinner! I couldn’t even finish my portion of the salmon! DELISH though!

Salmon and a Simple Guacamole

image

INGREDIENTS

1-2 lbs salmon (I did 2 salmon steaks of sockeye salmon – wild caught)
1 TB olive oil (I used light extra virgin olive oil)
1 tsp salt
2 tsp Emeril’s Bayou Blast Cajun seasoning
2 TB butter
1 tsp black pepper
2 TB lemon juice

For the Simple Guacamole:

1 avocado, sliced
1 green onion diced
Juice from 1/2 of lemon
1/2 cup frozen corn (or fresh) slightly heated up and set aside
Salt and pepper to taste
2 TB chopped fresh parsley

image

INSTRUCTIONS

Drizzle the olive oil over the salmon and rub the Cajun seasoning over and into the top of each salmon steaks. Place in fridge until ready to cook. Preheat oven to 350 degrees.
Place the cast-iron grill pan onto the stove and heat to medium-high. Salt the grill pan lightly.
Combine the avocado, green onion, parsley, lemon juice, corn and salt and pepper in a bowl and mix well, chill until ready to use.
Grill the salmon skin side down on grill pan for 4 to 5 minutes. Top the salmon with pieces of the butter and the lemon juice and place into preheated oven (still on cast iron grill pan… make sure yours is oven safe!) And bake for 5-10 minutes to desired doneness. It really depends on the thickness of the salmon steaks. (I baked them for approximately 8 minutes.)
Top with some of the simple guacamole and enjoy!

image

And now, for the quote of the day:

image

Oven Roasted Broccoli and Spicy Shrimp

So, I haven’t posted in a while… we very spontaneously went out of town to visit my husband’s grandfather. We have been asking him if we could visit him for a while and he would always come up with a reason we couldn’t visit: hurricane season, ebola… etc. You get the gist. Well, my hubby was talking to him and he said we could come and visit, but only of we came before June 1st (hurricane season)! So… we packed up and drove 8 hours and spent the weekend with him! He is 95, and we felt like… you never know how many more visits we will be able to make, so we went down to visit him! I did cook quite a bit while I was down there, but did not document any of it… but these are a couple of dishes I made before and after the trip!

Oven Roasted Broccoli and Spicy Shrimp

image

Ingredients:

1/2 lb peeled and deveined wild Caught Shrimp (I used TJ Argentinian Red Shrimp)
2 TB unsalted butter
1-2 cups frozen (or fresh) broccoli
1/4 tsp Himalayan sea salt
1/4 tsp fresh ground pepper
Drizzle of olive oil
1/2 tsp Cajun seasoning (Emeril’s Bayou Blast is great!)
1 TB lemon juice drizzled over top
Parmesan cheese if desired

image

Directions:

Preheat the oven to 375 degrees. Line a baking sheet (that has a raised lip… like a cookie sheet) with tin foil and either grease with a bit of butter or cooking spray. Put raw shrimp and broccoli in a bowl and toss with the ingredients until well coated. Spread so there is a single layer out on the baking sheet. Place in oven for 12 to 15 minutes until shrimp is cooked thru and no longer translucent, but also not over cooked. Remove and squeeze a bit of lemon juice over top and serve immediately.

Enjoy! This one is a quick and easy filling dinner. Serve it over rice, as is, or with a bit of fruit! This one was delicious!

And now, for the quote of the day:

image

Oven Roasted Sausage and Potatoes

This dish was definitely easy! You do have to have 30-45 minutes to bake/roast it… but it is completely worth it! Just a little chopping and peeling, a bit of stirring and you’ve got a filling and hearty meal that the whole family will LOVE! You could even use these same ingredients and put them in foil packets and toss them on the grill for a quick and easy meal as well! Either way it will turn out delicous!

image

Oven Roasted Sausage and Potatoes
Serves 4

1 package of nitrite/nitrate free turkey kielbasa or smokes sausage
1/2 large yellow sweet onion, peeled and chopped
3 large yukon gold, peeled and chopped into 1/2 inch cubes
2 large sweet potatoes peeled and chopped into 1/2 inch cubes
olive oil
fine sea salt
freshly ground black pepper
1/4 tsp smoked paprika
1/2 tsp. dried thyme
1/2 tsp dried dill
1/2 tsp dried oregano
1-2 TB butter
a handful of grated strong cheddar cheese or parmesan cheese

image

Preheat the oven to 400 degrees F. Spray cooking spray on a large 9×13 baking pan (casserole dish) or thinly coat with a bit of butter. Set aside.

Put the sausage rounds, onions and potatoes into a large bowl. Drizzle with a couple turns of olive oil and season to taste with salt, pepper, paprika, dill, oregano (and even a dash of cayenne powder for a bit of spice if you’d like!) and dried thyme. Toss together with until everything is evenly distributed. Pour this out into the baking dish, and spread it out as much as you can. Top with small pieces of the butter evenly across the top (optional) for nicely browned potatoes.

Place into the heated oven and roast for 45 minutes to an hour, stirring every 15 minutes or so, until the potatoes are golden brown and tender. Turn off the oven. Scatter the cheese over top of the cooked meat and potatoes, Pop back into the oven a few minutes to melt the cheese. Serve immediately.

NOTE:  I would not use any more than 1/2 tsp of the dried thyme, unless you really, really like the flavour of thyme.

image

Enjoy!

And now, for the quote of the day:

image

Greek Yogurt Chicken Salad

Tonight, we dined on our back screened-in porch, with the breeze and our ceiling fan blowing, our kids playing nicely in the play room… eating this awesome and fresh dish. PERFECT! It’s like the quintessential summer picture in my mind!

It was a bit busy today too, catching up on things that I didn’t get done over the weekend… our freezer decided to “re-set” and go back to factory settings and essentially “turn off”. And, of course, I didn’t notice it right away until half of my things had thawed overnight. So, a LOT of my leftovers and some of my fish and shrimp and chicken had to be tossed 😦 . I was so sad! It’s so tough to have to empty out your freezer… over half into a trash bag! *SOB* ! Luckily a lot stayed frozen in the back and towards the bottom. LUCKILY we have a deep freeze in our garage where I had some of my other purchases and was able to transfer my saved food until the freezer re-started and got back down to proper temperature. At least my fridge didn’t freak out as well! I would have had a melt down!

So, tonight, I had to find chicken that hadn’t thawed and be thrown out, so chicken thighs it was!

wpid-1430786584424.jpg

INGREDIENTS

 This is for 3-4 servings, depending on serving size.

2  large chicken thighs
– cooked with 2 TB butter, 1 TB olive oil, 1/4 cup water, 1/2 tsp thyme, salt and pepper. Simmered at medium             high until cooked through and then diced.
1/4 cup parsley, finely chopped
2 scallions (green onions) chopped fine
1/2 cup red grapes cut in half
2 heaping TB PLAIN Greek Yogurt
Juice of 1/2 of a lemon plus the zest
Salt and pepper to taste
6 romaine leaves
1/4 tsp coriander
dash of hot sauce
1/8 tsp smoked paprika
1/2 cucumber (English Hothouse Cucumber) halved and quartered
1/2 avocado thinly sliced to line the romaine leaves
wpid-1430786744464.jpg wpid-1430786672260.jpg

DIRECTIONS

  • In a large bowl, combine the chicken with the parsley, cucumber, scallions, lemon zest, hot sauce and seasonings, and grapes. Season with a pinch of salt and pepper and give it all a good toss.
  • Add the lemon juice and the greek yogurt and stir to combine. Add the chopped parsley, and toss!
  • Serve scoops of the salad in the wide end of romaine leaves that are lined with slices of avocado. Serve immediately.

wpid-1430786807227.jpg

This was DELICIOUS! Try it now! 🙂

And now, for the quote of the day:

INFP INFJ

Fresh Quinoa Avocado Spinach Salad

Sunday night I went to a marriage mentor group and it was requested that I bring a salad! I do love a fancy salad! Getting creative and figuring out how to make a new dressing, using fun ingredients and pumping up the taste and flavors… the BEST!

This one I found the original recipe on a website about the Mediterranean Diet and altered the salad adding a bit more flavor to it and hit the JACKPOT! It was delicious! The only thing I’d change is that I would have made it a bit more dry than I did. I added WAY more olive oil and lemon juice than they did originally… and I’d go half-way between the two… So the recipe below is exactly halfway between what I made, and the original recipe (on the amount of olive oil and lemon juice)

This one can be filling as a main dish for lunch, or an awesome side dish for a grilled hamburger night, or brats or pizza!

Make this one tonight! 🙂

wpid-1430760259854.jpg

Fresh Quinoa Avocado Spinach Salad

Ingredients

1/2 cup uncooked Quinoa, rinsed and drained*
1 cup water
1 vine-on medium tomato – seeded and chopped
1/2 cup shredded fresh spinach – chopped or torn into large pieces
1/3 cup diced FRESH basil
1/3 cup finely chopped yellow sweet (1 small)
1/4 cup fresh squeeze lemon juice (and the zest of 1 lemon)
3 tablespoons olive oil
1/8 tsp garlic powder
Salt and pepper to taste
 1 ripe avocado sliced and diced (pit removed of course!)
1/3 cup crumbled feta cheese
1/2 of a English Hothouse cucumber sliced and quartered

wpid-1430760454567.jpg

*Rinse quinoa thoroughly before cooking to remove a bitter substance called saponin that coats the seeds.

Directions

  1. In a 1-1/2-quart saucepan combine quinoa and water. Bring to boiling; reduce heat. Simmer, covered, about 15 minutes or until liquid is absorbed. (OR, as I did, use your Rice Cooker… EASY!)
  2. Transfer quinoa to a medium Mixing Bowl. Add tomato, spinach, basil, cucumber, and onion; stir to combine. In a small bowl, whisk together lemon juice, garlic powder, oil, and salt. Add to quinoa mixture; toss to coat. Add the diced avocado and gently toss.
  3. Sprinkle with some of the feta. Makes 4 main-dish servings.

wpid-1430760379847.jpg

Fresh AND filling!!

And now, for the quote of the day:

Southwestern Chicken Salad with an Avocado Parsley Dressing

When you come home after a long day at work and it’s hot outside… the weather is nice, sun is shining… don’t you just crave a salad? Nice, cool, crisp? Add a bit of chicken and just enough spice to make the dressing’s coolness almost a relief?

This is the salad for you! I seriously craved this dressing after I had it the first time. I made ANOTHER salad for lunch the next day JUST so I could use the rest of the dressing. It was THAT amazing!

wpid-1430759696837.jpg

This is for 3-4 salads, depending on size of salad… is it your main course, or a side?

Ingredients

Salad:

Large head of Dark Green Romaine
1 15 oz. can Black Beans, rinsed and drained
3 mini sweet peppers chopped
1 pint cherry tomatoes
1 medium vine-on tomato cut into 1/2 inch pieces
2 Chopped scallions (Green Onions) – if so desired
1/2 Avocado diced
2 chicken tenderloins cooked (I cooked w/a bit of cumin and chili powder and olive oil) and sliced PER SALAD)
1 cup (more or less) corn. I used thawed frozen corn… you can use fresh or canned as well
1/2 can diced Natural Black Ripe Olives
Drizzle of salsa

For the dressing:

1 cup loosely packed FRESH parsley, stems removed and roughly chopped
1/2 avocado
Juice and zest of 1 lime
1/2 tsp Chopped Garlic in Pure Olive Oil
1/4 cup olive oil
1 1/2 tsp. White Balsamc Vinegar
salt and pepper to taste
1 TB fresh local Honey

wpid-1430759784585.jpg

Directions
Make the dressing: puree all ingredients in a food processor/blender (I used my Nutribullet) until smooth. Taste and adjust seasonings if necessary.
Finely chop romaine, sautee your chicken until cooked through and white all the way through, chop the sweet peppers, tomatoes, and green onions, avocado, black olives…
Place all ingredients in a large bowl and stir to combine.
Toss with desired dressing. I did find that the salad was best when I drizzled the salad with the dressing, and then tossed to coat thoroughly!

wpid-1430759872855.jpg

You will NOT regret making this salad!

And now, for the quote of the day:

Community Post: 13 Incredibly Awesome Amy Poehler Quotes

What’s in Your Pantry?

(FYI, this is NOT my pantry, it’s found on GOOGLE search under the term: pantry. BUT, if anyone wants to come to my house and come and help my pantry LOOK like the above picture, let me know!)

So I was chatting with one of my friends and she was saying she sees a recipe on here and looks in her pantry and she doesn’t have any of the ingredients! And, of course, I realize that not everyone shops WITH me! People don’t see what I always keep stocked. People don’t see my meal plans! 🙂

I COULD just go to people’s house and cook for them… because, actually, I’d really like that. How fun would teaching people how to cook and cooking for them be? Maybe I’m crazy, but I’d LOVE it! It’s such a passion of mine, to cook, and passing it on to anyone would be a blast!

Moving on…

I decided to list my “staples”. Things that, if I run out, I always try to replace them when I go again. That’s also where the “Out of Milk” app comes in handy, because I quickly add it on there so that I don’t forget next time I shop!

So, here goes:

MUST HAVES in my pantry, fridge and freezer:

1. Zucchini – when in season

2. Frozen veggies – my favorite is corn, broccoli, peas and green beans.

3. Carrots and onions – my favorite is a sweet yellow onion

4. Bread – it’s actually for my kids, but I always have some. It’s a tragedy if I run out before the 2 weeks is over!

5. 1/2 and 1/2 and Heavy Cream – for coffee AND cooking

6. BUTTER!!! A MUST have!

7. Flour, sugar, honey, baking soda, baking powder and flax meal – all of these last a WHILE and I don’t have to replace them very often.

8. At least 1 jar of Organic Pasta Sauce – whether it’s for my little boy’s meatballs, or something else. I make sure I have 1

9. At least 1 type of “pasta”. So, Quinoa, Couscous or a high fiber, Whole Grain Pasta

10. Lettuce (dark and leafy) or baby spinach – for all SORTS of dishes!

11. Greek Yogurt FULL FAT and PLAIN – a must have for a snack (add a little honey to some plain greek yogurt, stir and EAT for a high protein snack!), for cooking, baking and also in place of sour cream it works amazingly!

12. Garlic – I either buy it in a jar with olive oil already minced, or a fresh clove… just depending on how I feel

13. Spices I always have in my cupboard: Oregano, Cumin, Paprika, Garlic Powder, Salt and Pepper, Turmeric, Curry Powder, Onion Powder, Chili Powder, Italian Seasoning, Cayenne Powder, Dried Basil, Dried Thyme, Dried Parsley, Dill

14. My favorite FRESH herbs: Basil, parsley, cilantro. I don’t always keep these because they go bad quite quickly. I have fresh herbs growing in my garden in my yard during the spring and summer, and then in the fall and winter, I purchase certain herbs (if I feel fresh is worth the cost) for specific recipes.

15. Lemons and Limes- I try to have at least 3 of each

16. Avocado – when they are in season, I usually by 5 or 6 when I shop for the 2 week time period. I buy them when they are still hard and let them sit out on the counter. When they start to get ripe I transfer them to the fridge and they stay good until my 2 week period of time (between shopping trips) is up!

17. Chicken Tenderloins from Trader Joes – these are just… the best. I’ve bought fresh, frozen etc from many other places and nothing quite compares! The frozen Chicken Tenderloins from TJ wins out every time!

18. Fish/Shrimp/Seafood – I’m picky about this. I do NOT always have these. Even if I’ve planned a recipe for any one of these and I go to the store and they don’t have any wild caught at a good price… I do NOT purchase it. I will change my recipe to something more cost effective. I have certain rules. And I don’t like to pay more than $8.99/lb for wild caught shrimp.

19. 1 lb. of ground beef. I like no-hormones, all natural ground beef. If I’m lucky World Market or Earth Fare will have some fancy shmancy grass fed ground beef that I stock up on when it’s on sale! But… if not, I get the highest quality for the best price possible. Sometimes I only buy 1 lb for the 2 week period and make it last. Just depending on the price.

20. “Fancy Beef” – steak, ribs, short ribs, beef tips, sirloin, roast. I don’t make these often. I try to plan it ahead of time if my budget allows, or when it’s on sale. I will sometimes put a meal plan on the list for a roast, etc just in case there’s a good price on it when I’m shopping. If there isn’t, I don’t make it for that time period, but I save it on my pinterest board for when it does! Or… if my husband and I have an at home date night.

21. Carrots! I like to buy the large 2 lb. bag of full size organic carrots. My kids even like it because they act like bunnies! 🙂

22. Potatoes – I buy either Yukon Gold or Sweet potatoes. Whichever is on sale or what I’ve planned for that time period.

23. Cheese – Parmesan Cheese, cheddar, shredded, block, cottage cheese, etc. I try to have at least 1 on hand. Also… depending on price. Sometimes cheese is BOGO!

24. Canned tomatoes or salsa. I like the off-brand of Ro-Tel (fire roasted tomatoes with green chilis). You can do A LOT with salsa or canned tomatoes! No joke!

25. Beans – canned. Like, black beans, Pinto Beans, cannelini beans. You can put them in soup, chili, salad, make refried beans on your own… the options are HIGH! And… they are cheap! There are times I can get them for under $0.50/can!

26. Tomato Paste – You saw my tube of tomato paste in a previous post. You can do so much with so little of it! Tortilla soup, enchiladas, chili, pizza or spaghetti sauce, etc. A little can go a long way!

27. Chicken Broth or Vegetable Broth… SOMETIMES Beef Broth – because I make a lot of my own sauces instead of buying them, these are essential. I can use this in a soup, chili, baked dish, sauteed dish, quick or baked, oven or crock pot… I try to keep 2 in my pantry. I don’t always use them, but I’m always glad I have them in my pantry! They keep for a long time too!

28. Things for my kids to snack on: hummus, cucumber, apples, grapes, strawberries (depending on when in season/on sale) raspberries, crackers, chips, pita chips, etc. I don’t always get ALL of these, but usually 2 or 3 of them.

29. Sunflower Seed Butter and Jelly and Preserves (I use this in place of any “nut” butter) – for sandwiches and cooking and snacking

30. Organic Old Fashioned Oats – for breakfast or baking!

31. Last, but not least OLIVE OIL Organic Olive Oil. I use it daily!

If I have all of these “essentials” as I call them, I can make a meal pretty easily! I can mix up the ingredients, or buy a few “odds and ends” and make something new and fancy! Seems like a long list when I put it all down, but I don’t have to buy these every time I go shopping, so that helps with cost. Healthy and whole ingredients and an endless amount of meals you can make with these ingredients! I do buy a few different things for my kids like chicken nuggets, etc… (if I don’t make them that week)… but overall these are my must-haves.

What are your go-tos? Anything that you MUST have in your fridge or pantry?

Let me know!

And now, for the quote of the day:

You need to release the load that God never meant for you to carry and focus on what He has called you to do.

Lemon Dill Mahi Mahi with a Lemon Dill Cream Sauce

My husband got home late, again, and I wanted something light to eat being that it was so late. I also wanted something QUICK! So… FISH! Both healthy and quick. The nice thing about this dish too is that there’s quinoa in the rice cooker… very hands off… and fish has a quick sear and then goes in the oven. The only thing you really have to watch is the sauce. Everything is done in 15 minutes flat though!

Sometimes I like to tell funny stories about things that happen around my house… so I’m gonna tell a little quick story here. This honestly may be TMI for you… but I keep giggling about it so, I’m gonna share it.

The other day my kids had their well check at the doctor. After kids are potty trained they test their urine and have them “pee in a cup” to be tested. Well my 3 year old little boy actually found this fascinating and thought it was fun to go in a cup! Fast forward to later that evening when I am making dinner and I hear my 6 year old daughter yell “MOM!! You are NOT gonna be happy! Levi is making a VERY BAD choice!”. I NEVER like hearing that. Never. So, I head upstairs and my 3 year old little boy is in the hallway up stairs (luckily it has wood floors) peeing into a cup. He looks at me and says “cup too wittle mommy” with very innocent and questioning eyes. Oh my goodness, I seriously  had to stop myself from laughing. He got to do this at the doctor, why couldn’t it be ok at home? The only problem? He used a small plastic medicine cup that’s about the size of 2 TSP. Yeah. It was ALL OVER the floor… poor boy.. he didn’t realize that medicine cup would just be too small. Oh man. And then I usually have him  help me clean up the mess, this one, I didn’t want his help. No thanks little messy one. No thanks. 🙂 We had to have a little talk about what is ok at home, and what is ok at the doctor’s office to remind him where it’s ok to go potty. Oy!

LOL.

So now, on to the recipe that I was still able to make later that evening!

wpid-1430326594449.jpg

Serving Size : 2

Lemon Dill Mahi Mahi with a Lemon Dill Cream Sauce

Ingredients
For the Fish

  • 2 4ounce Mahi Mahi fillets (or any fish of your choice)
  • Zest of 1 Large Lemon
  • Juice of Half a Large Lemon
  • 3 T of Melted Butter or Olive Oil
  • 4 tsp dried dill
  • salt and pepper to taste
  • 4 slices of lemon
  • 1/2 cup whole grain quinoa
  • 1 cup water
  • 1/2 cup frozen peas

For the Sauce

  • 1/2 cup greek yogurt (whole fat or 4%)
  • Juice of Half a Large Lemon
  • 1 TB butter
  • 3 tsp dried (or fresh) dill
  • 2 TB fresh parmesan

wpid-1430326431576.jpg

Directions

  1. Pre-heat oven to 375. Salt your cast iron grill pan or skillet and heat on medium. Place fish onto hot skillet (I cooked mine from frozen and they turned out GREAT!!)
  2. Rinse 1/2 cup of quinoa and place into a rice cooker (or cook to instructions on the package) and put 1 cup of water in with 1 TB of olive oil drizzled. Close rice cooker and push cook button and leave to the side.
  3. Pour melted butter and lemon juice over fish. Sprinkle evenly with lemon zest and dill. Add salt and pepper as desired as well.
  4. Place in oven and bake approximately 15 minutes or until fish is white, fully opaque, and flaky.
  5. While fish is baking, put butter, lemon juice and dill into a small sauce pot stirring while melting. After the butter is melted and it’s incorporated well, add the Greek yogurt while whisking in…. whisk until well incorporated and then add the parmesan in the same manner. Mixture will thicken as it cools.
  6. Open cooked quinoa and put the 1/2 cup of frozen peas into the rice cooker with the quinoa and stir. Let the peas sit in the rice cooker for 2-3 minutes so they get warm, but still have a bit of a “pop” or “crunch”.
  7. Place fillets onto a pile of the quinoa with peas and garnish with sauce.
Enjoy!!!
wpid-1430326518700.jpg
This one was so yummy, I will definitely make this one again! easy too… not too many ingredients, but still made with all “Real Food” in regards to my last post! 🙂
And now, for the quote of the day:
//