Creamy Tomato and Shrimp Pasta

Last night we eat dinner late. So bad. I read a few different blogs about healthy eating, especially my FAVORITE : http://www.dietitiancassie.com/ . Do I follow all of her rules? No. Should I? Maybe yes… maybe no? Everyone’s body is different. But she is very smart and has a lot of good information on how to naturally keep our bodies healthy, and how to think about food and what we put into our bodies completely differently than what we’ve been taught… and stay healthy! Check out her page!!!

Anyways… back to eating late. I know I shouldn’t have dinner that late… but I was making a blanket for my daughter, Madilyn and I was almost done crocheting it and I looked up and it was almost 8:00 and I hadn’t started dinner! Woops! Luckily it only took me 20 minutes to make from start to finish… so… pretty darn good!

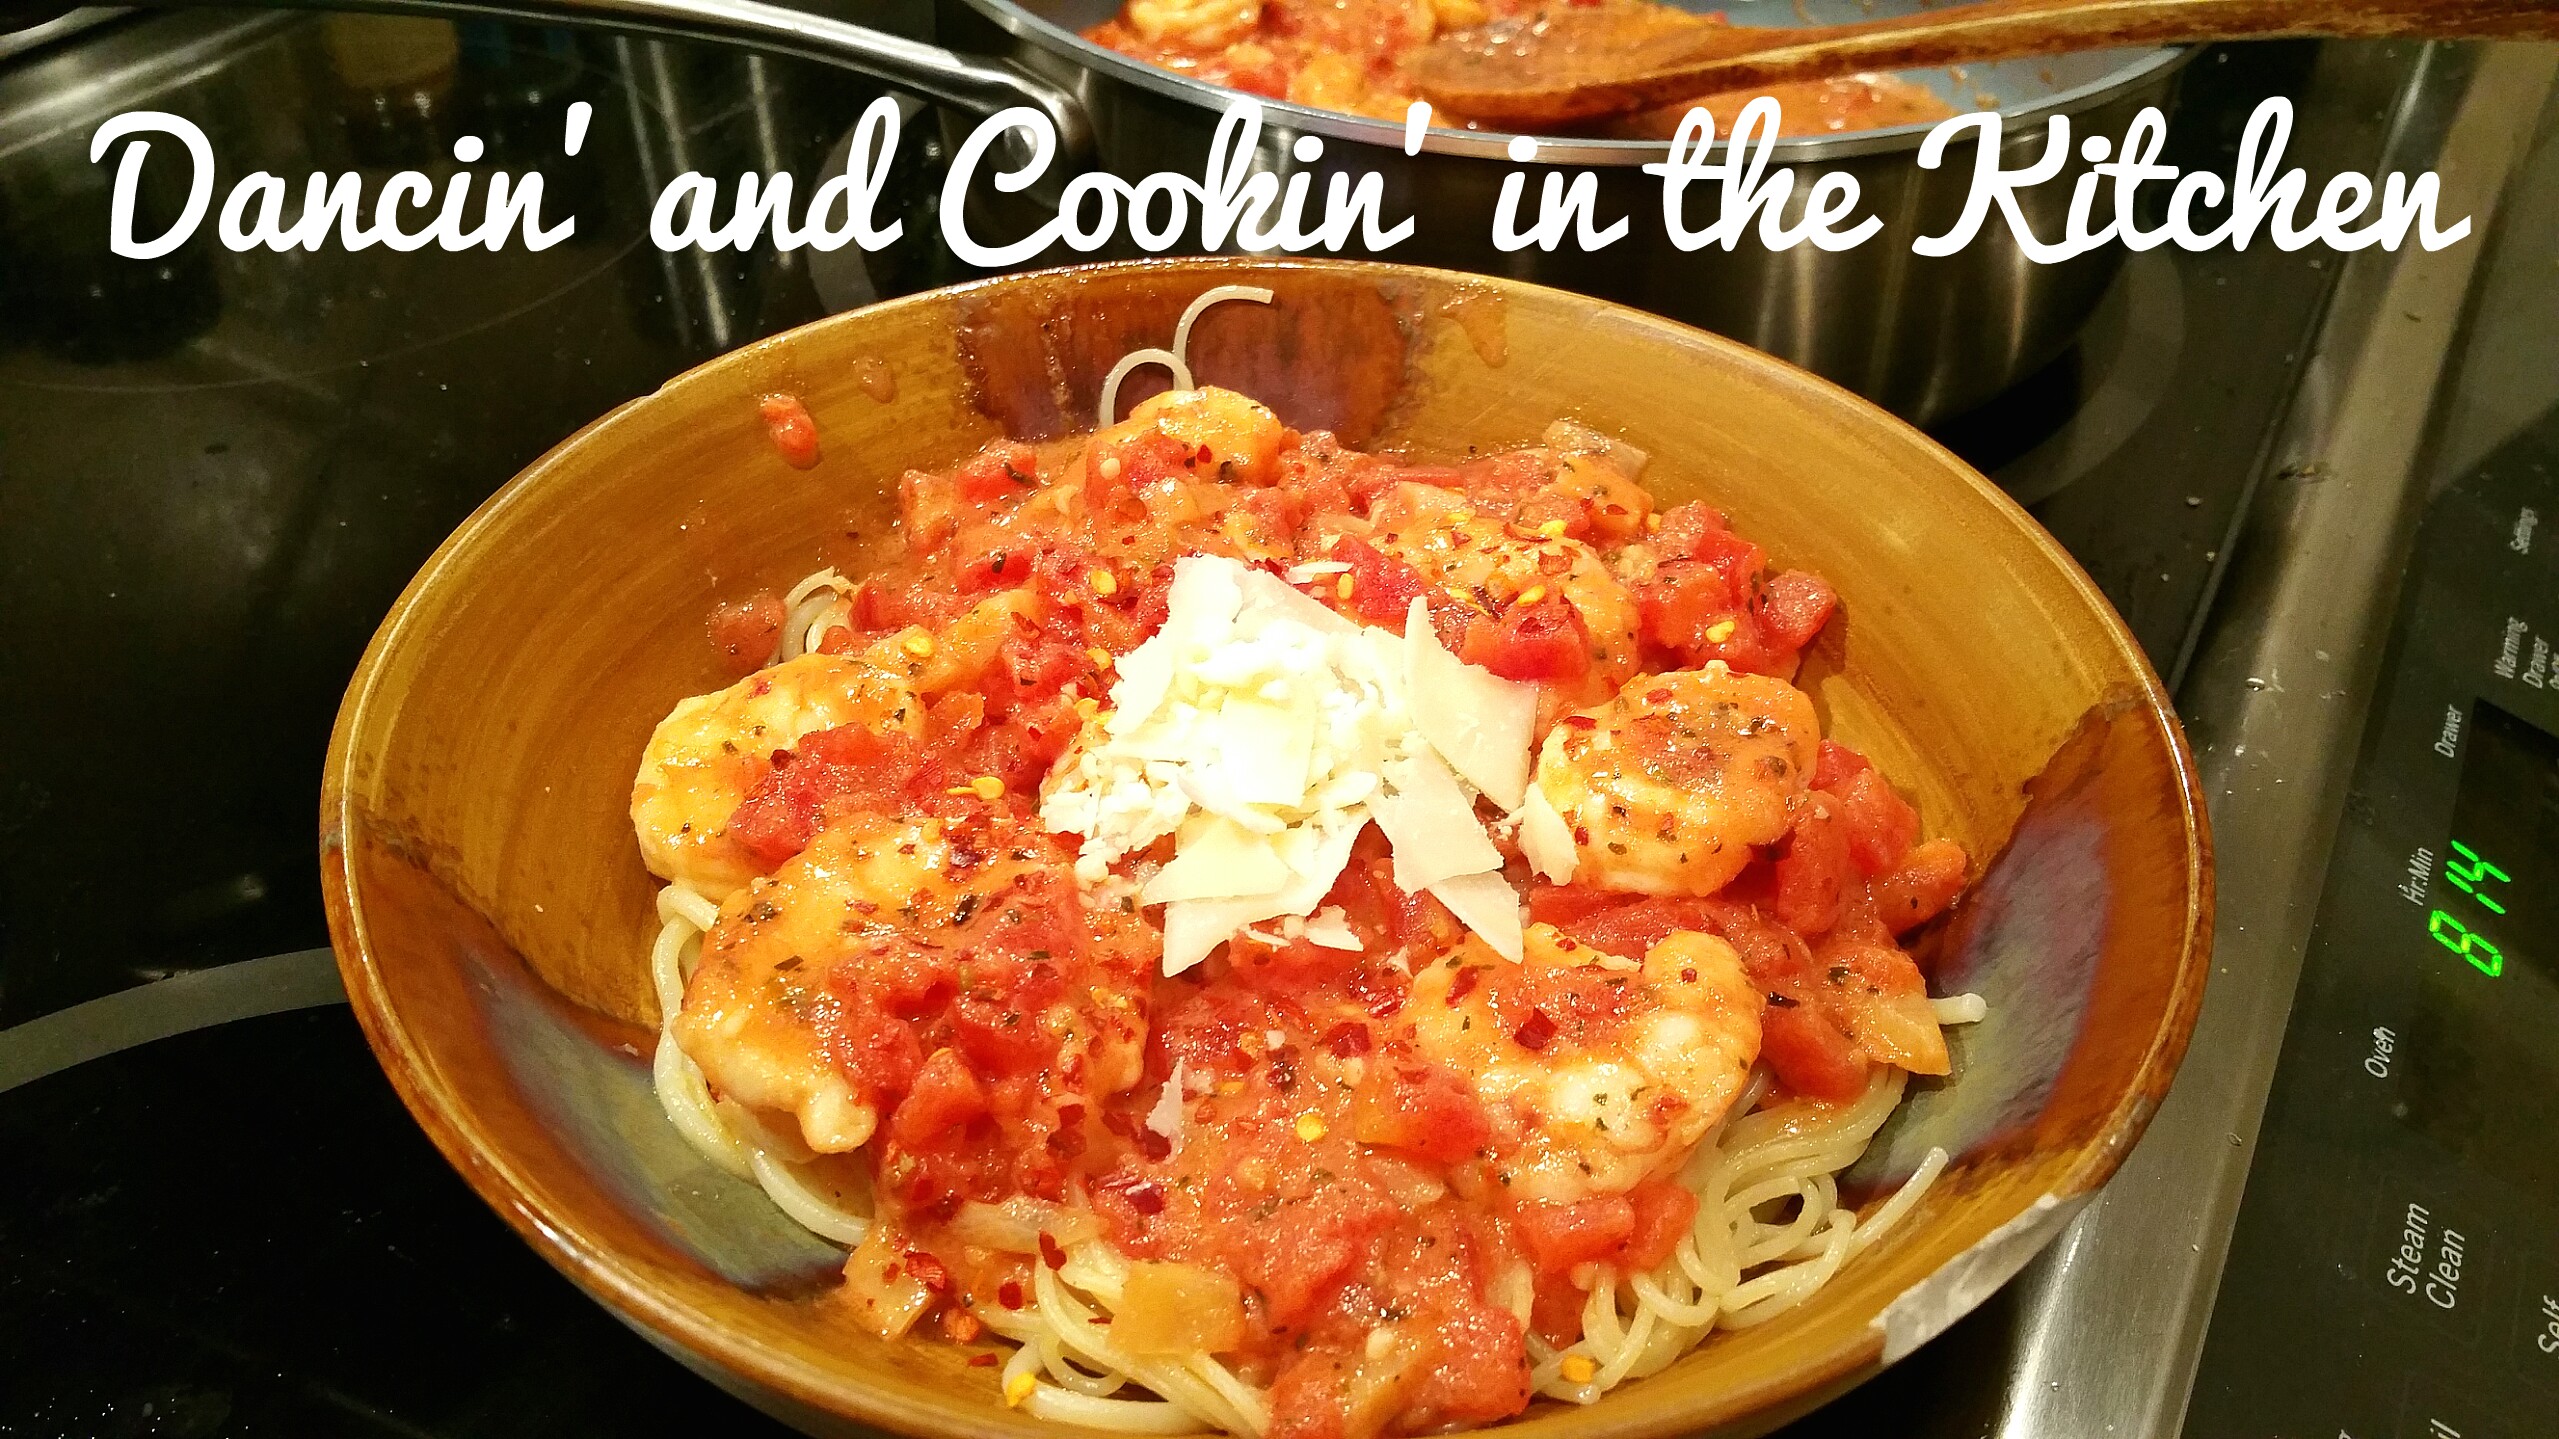
This one is simple, full of flavor, quick and very filling. Yes, it does have pasta. I, of course, am steering you to Dietitian Cassie’s website and she’s pretty much grain free… and here I am writing a blog post with pasta in it. But… still read her blog. And.. decide for yourself what to eat…. ? 🙂 But… for me? I eat carbs/grains 1 time per day MAX, if not less often. I try my best to fill up on veggies and protein during the day… which really works for me! I’m not starving and HANGRY come dinner. I also have go to healthy fat, high protein snacks that I grab while I’m cooking that really help. I love celery with 1 TB sunflower seed butter. Also, when I am having a sugar craving, I grab 1 or 2 of these Butter Mints: http://empoweredsustenance.com/stop-sugar-cravings/ . Lots of good ideas!! 🙂

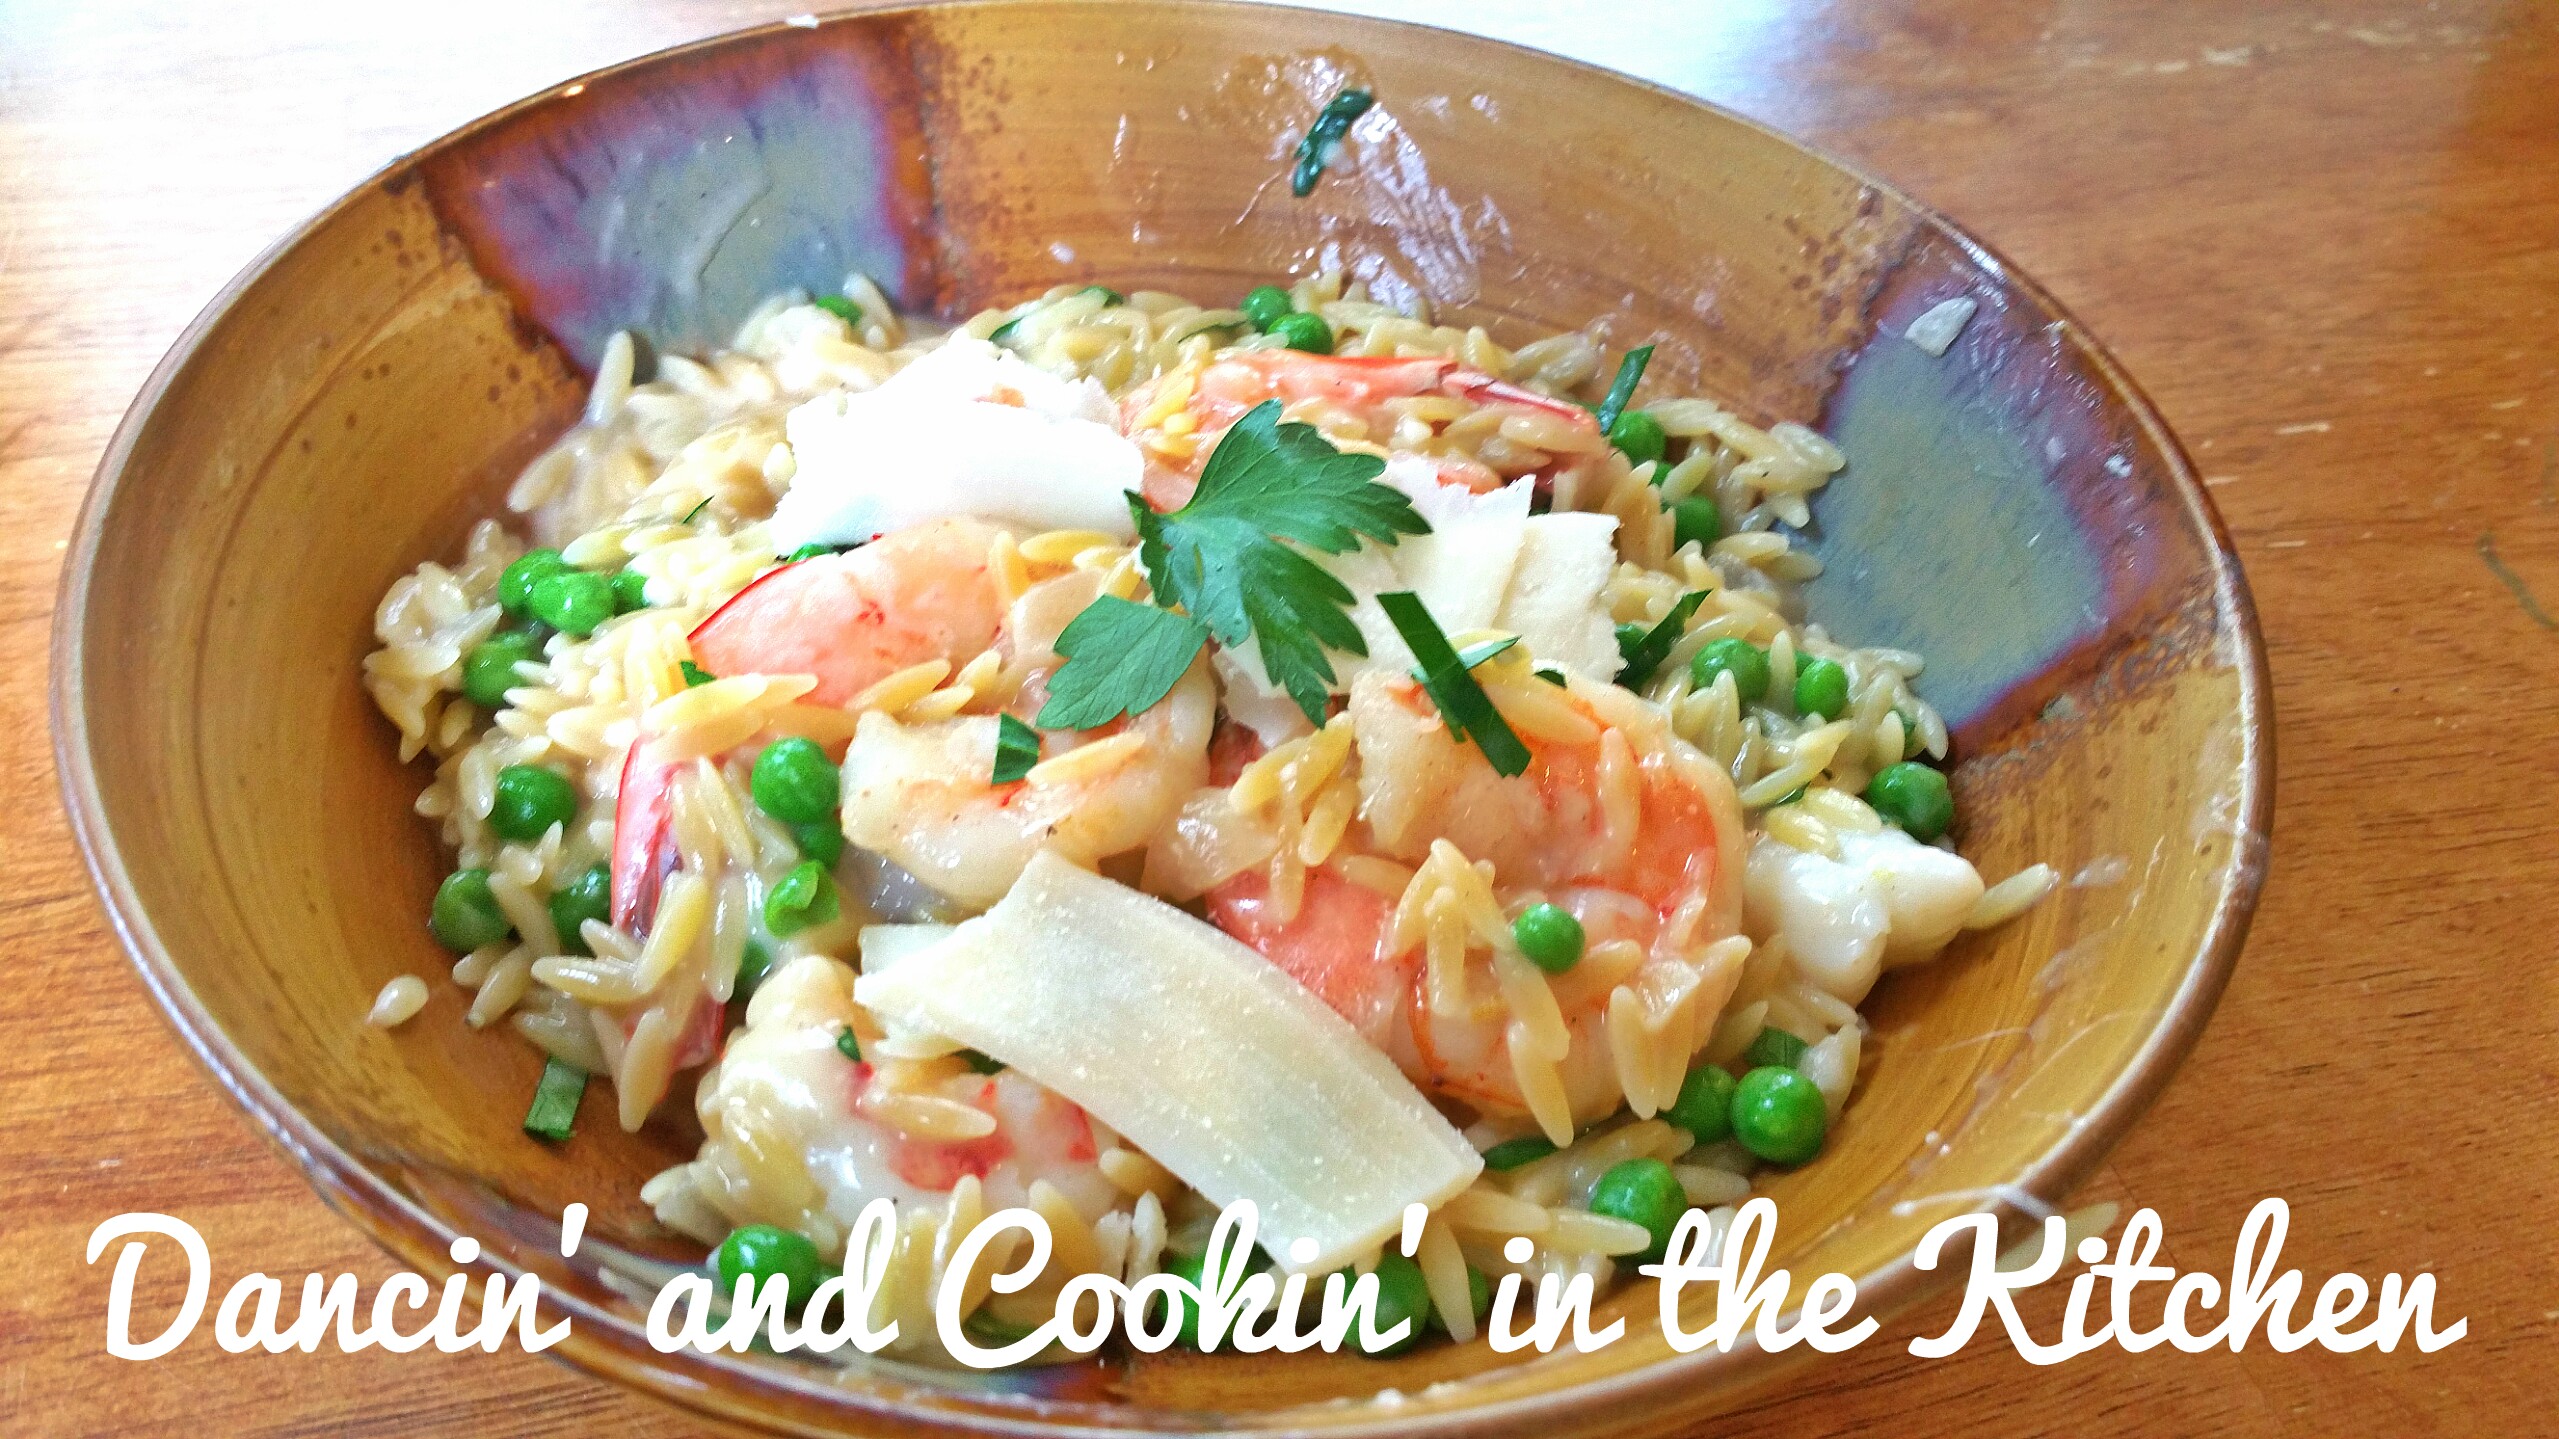
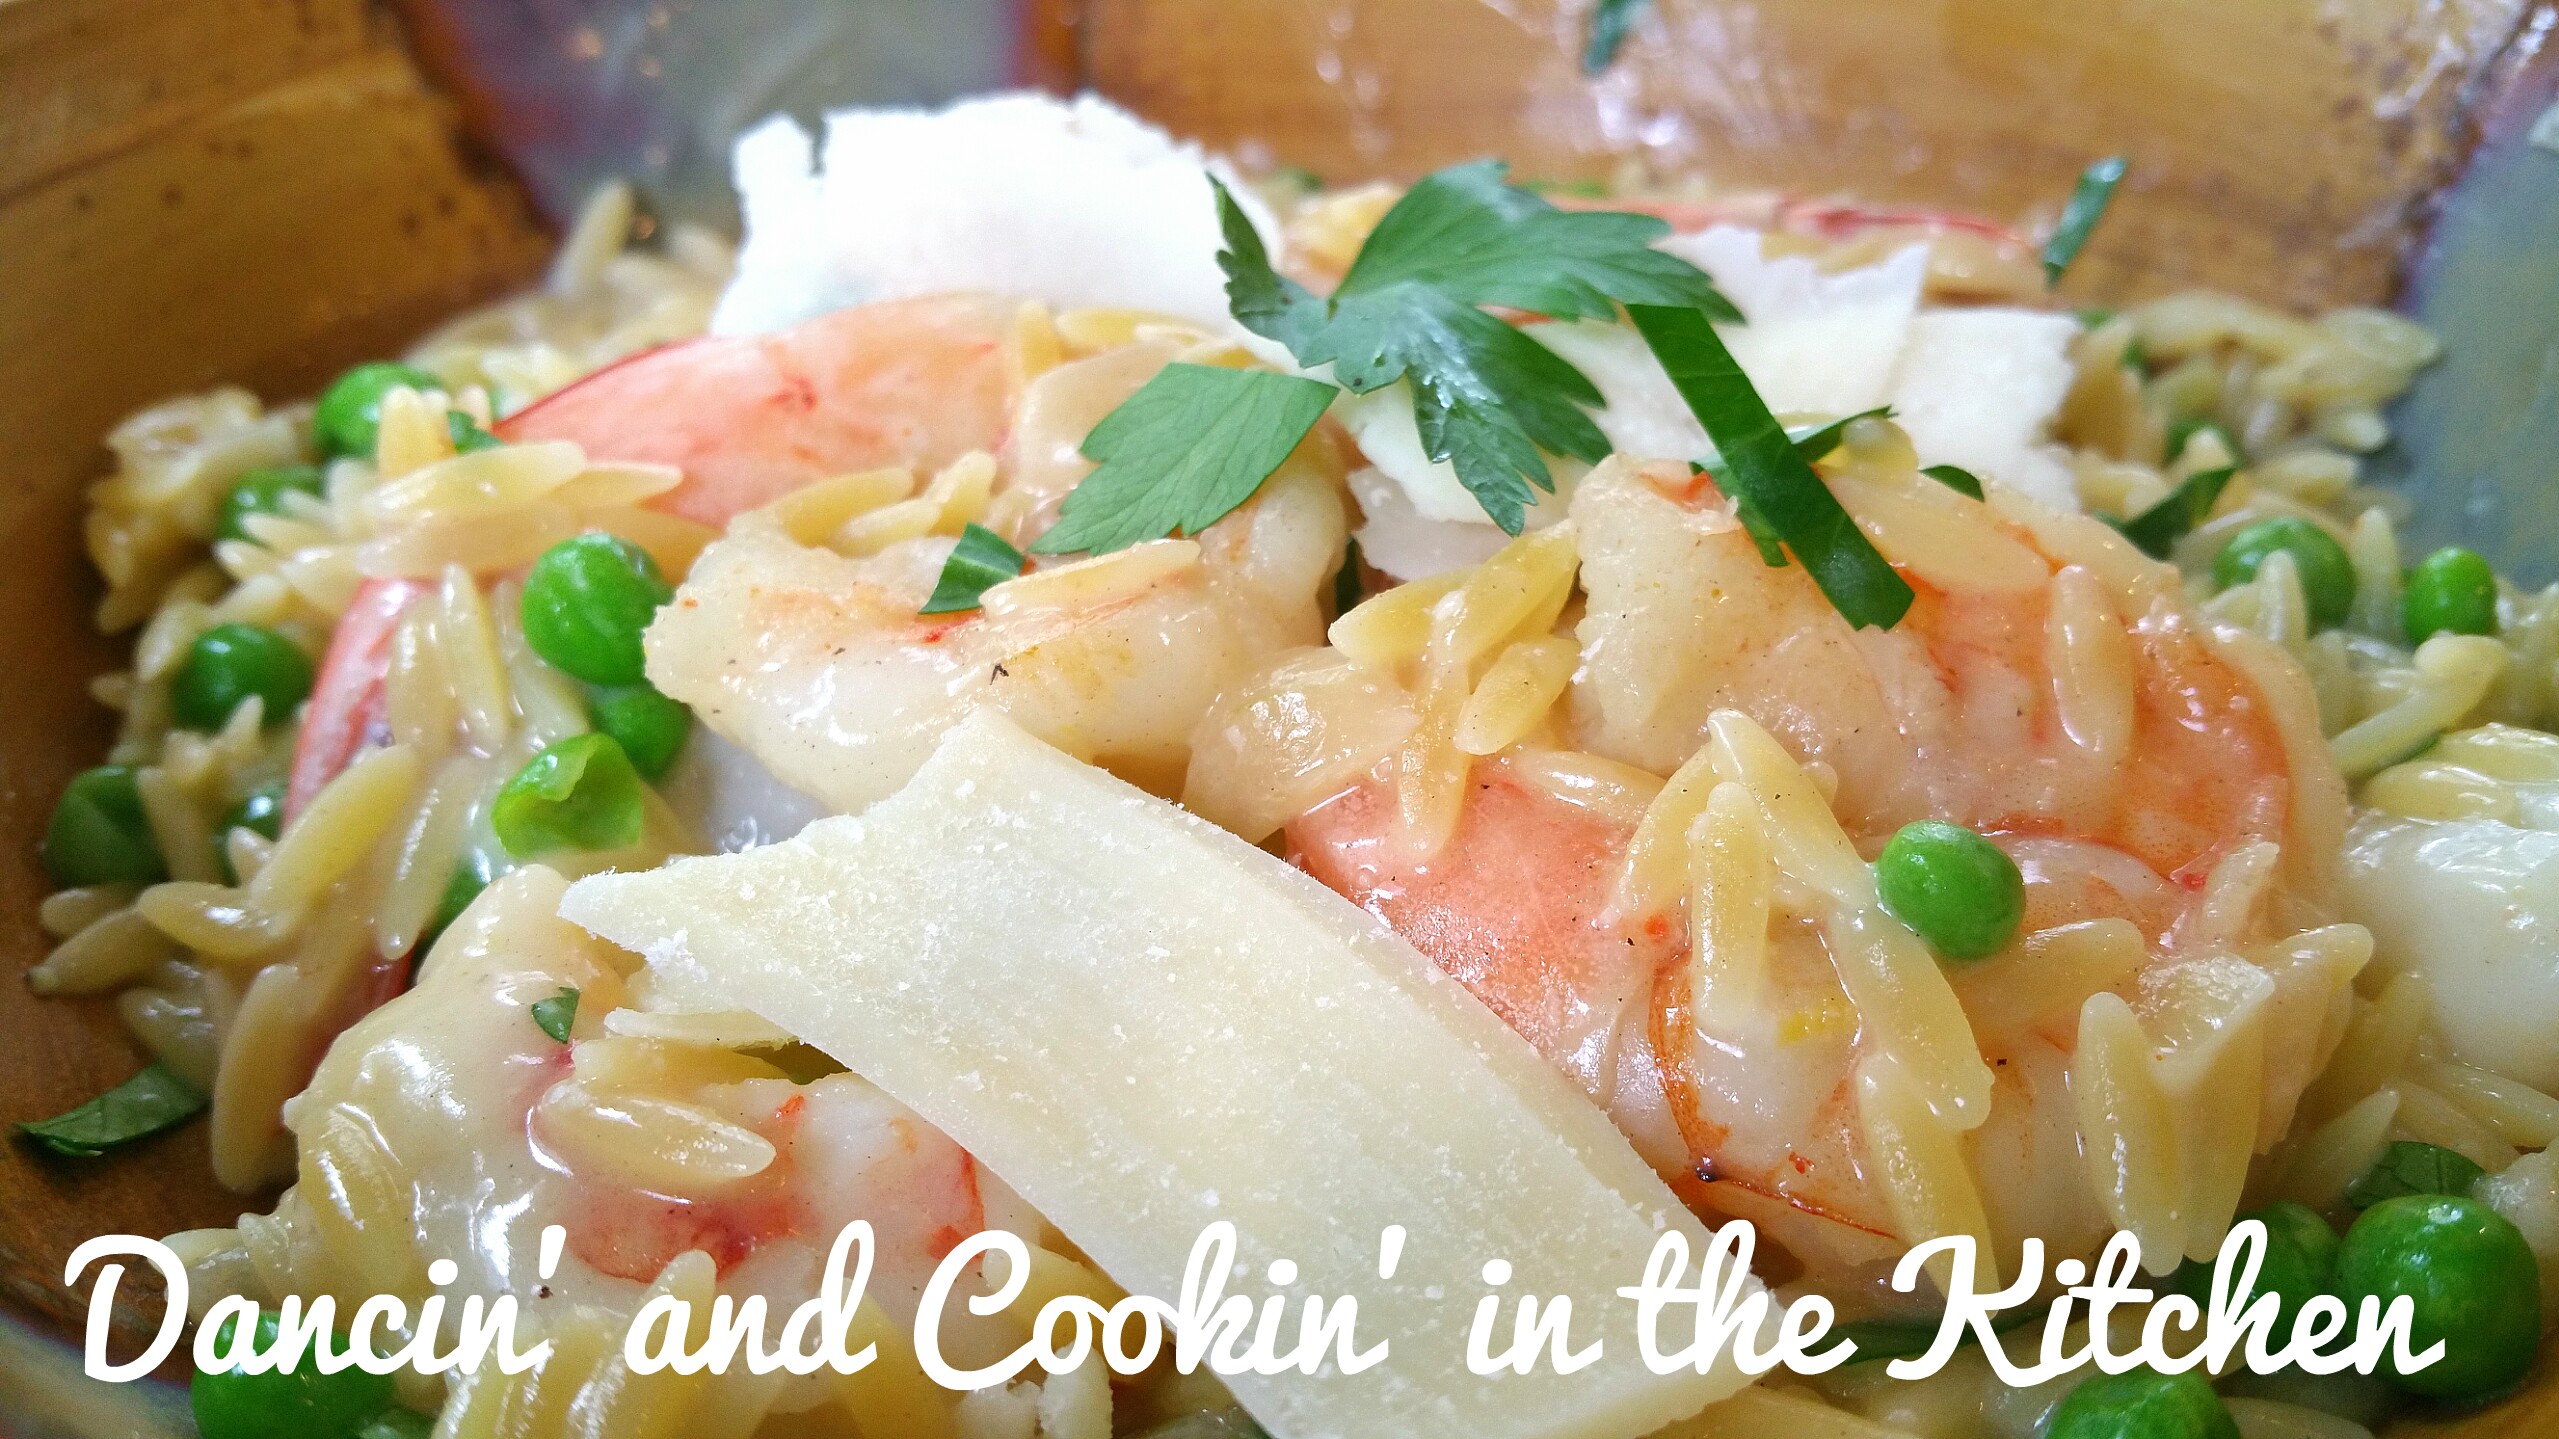
Here’s the delicious… pasta filled, quick and easy dinner recipe with some amazing and tasty shrimp:

wpid-1429921608694.jpg

for 3-4 servings

Ingredients
  • 1/2 lb shrimp (I used Trader Joes Argentinian Red Shrimp) (cooked and deveined)
  • 1 tbsp olive oil
  • 1 tbsp butter
  • 1/4 onion, chopped (about 1/4 cup)
  • 1/2 tsp minced garlic
  • 1/8 tsp cayenne powder
  • 2 TB parmesan cheese
  • ¼ tsp red pepper flakes (I used this on a garnish on my husband’s bowl since it’s too spicy for me… but he loved it)
  • 1 tbsp fresh chopped parsley
  • 1 can diced petite tomatoes (with the juice in the can as well)
  • squeeze of fresh lemon juice
  • ¼ cup white wine (I used a Riesling… just use your favorite)
  • salt & pepper to taste
  • ¼ cup heavy cream
  • spaghetti noodles
  • fresh parmesan for garnish
  • fresh parsley for garnish

wpid-1429921536429.jpg

Instructions
  1. On a baking sheet, place the shrimp (I do mine from frozen) on a foil lined sheet. Drizzle with olive oil, splash of white wine, a bit of lemon juice and salt and pepper. Place in a 375 degree preheated oven and bake for 12-15 minutes (depending on size of shrimp).
  2. While the shrimp is cooking, in a skillet, melt the butter with the olive oil, and saute the onions and garlic until soft.
  3. Add a squeeze of fresh lemon juice, cayenne powder, can of diced tomatoes, white wine and salt & pepper.
  4. Cook until the liquid is reduced to half.
  5. While the tomato mixture is simmering, boil the spaghetti noodles according to the package directions.
  6. Once the tomato mixture is done simmering, add the shrimp back into the sauce, stir and remove from heat.
  7. Stir in the heavy cream and the 1/2 of the parmesan cheese.
  8. Toss the tomato and shrimp sauce with spaghetti noodles.
  9. Garnish with fresh parmesan, red pepper flakes and fresh parsley
  10. Serve Immediately
  11. ENJOY!

wpid-1429922536742.jpg

And now, for the quote of the day:

03763d90b097a8047f84220923f96665

Lemon Thyme Chicken Thighs and Potatoes

I have seen a lemon thyme recipe on pinterest for the last few months and I’ve been craving it this whole time. I kept putting it off for other recipes for reasons unknown. So… the other night I decided that I was going to finally make this dish… with my own twist of course.

image

Ingredients

6 boneless, skin-on chicken thighs
1 tablespoon smoked paprika
1/2 tsp chili powder
Kosher salt and freshly ground black pepper, to taste
3 tablespoons unsalted butter, divided
1 tsp garlic, minced
1 cup chicken broth
1/2 cup heavy cream
1/4 cup freshly grated Parmesan
Juice of 1 lemon
1 teaspoon dried thyme
4 potatoes diced
2 TB parsley chopped for garnish

image

Instructions

Preheat oven to 400 degrees F.
Season chicken thighs with chili powder, paprika, salt and pepper, to taste.
Melt 2 tablespoons butter in a large oven-proof skillet over medium high heat. Add chicken, skin-side down, and sear both sides until golden brown, about 2-3 minutes per side; drain excess fat and set aside.
Melt remaining tablespoon butter in the skillet. Add garlic and diced potatoes (I used Yukon gold), and cook, stirring frequently, until fragrant, about 1-2 minutes. Stir in chicken broth, lemon juice and thyme.Bring to a boil. Return chicken to the skillet.
Place into oven and roast until completely cooked through, reaching an internal temperature of 175 degrees F, about 25-30 minutes.
Remove from oven and stir in the heavy cream and Parmesan and stir until well blended. Garnish with fresh chopped parsley.
Serve immediately.

image

This had a TON OF flavor! It was absolutely delicious! I loved every bite, as well as the leftovers today!  You definitely want to try this one! Taste as you go so you don’t put touch salt in it! And use low sodium chicken broth to make sure that, along with parmesan cheese, it doesn’t get too salty. 🙂

And now, for the quote of the day:

image

Chicken and Veggie Parmesan Skillet

I can’t believe I forgot to post this last night! This one was so fresh… and the veggies added a nice crunch! We did eat a bit later last night though.
This one took me about 20 minutes. It’s quick, easy, low carb (unless you have bread as a side like I did… haha) fresh and summery! Perfect quick dish on a weeknight!
My mom had my daughter last night, so I had just my son when I was making dinner. Isn’t it strange how when you go from 2 kids (or however many you have) to 1 less… the world suddenly seems so easy? Everything is simple all of a sudden . Butterflies are everywhere, birds are chirping, you can smell the roses… lol. But seriously. I sat and talked with him and had time to give him my full attention… and he LOVED IT! I’ve gotta do that more. Have focused one on one time with each of them. They just BLOOM (only term that seemed to properly describe it) in that time. I learn new stuff about them, they talk and just snuggle into me. I cherished it. 🙂
Ok, back to food.

image

INGREDIENTS:

1/2 tsp garlic, minced
2 TB olive oil
1/4 cup fresh lemon juice
Zest of 1 lemon (about 1 TB)
6 chicken tenderloins (or 3 chicken breasts)
Salt and pepper to taste
1/2 tsp dried oregano
Dash cayenne pepper powder
1/4 cup white wine (or chicken broth)
2 TB butter
1/4 cup chopped onion
3 sweet mini peppers chopped
1/2 cup frozen broccoli florets
1 cup frozen veggies: carrots, green beans, etc. Your choice
3 tbsp grated Parmesan cheese

image

DIRECTIONS:

1. Cook garlic, carrots and onions in a large skillet over medium heat for 1 to 2 minutes. Add chicken, salt and pepper, oregano, cayenne powder and lemon juice and the black pepper; cook 4 to 5 minutes on each side or until chicken is done (165º F.).

2. Add in the vegetables and white wine (or chicken broth) and butter; cook 2 to 3 minutes or until heated through, stirring occasionally.

3. Sprinkle generously with the Parmesan cheese.

Serve! This makes 3 – 4 servings depending on the size of serving you take. I served it with a couple of slices of bread. You can do quinoa, pasta, or some fruit! Totally up to you! This one was amazing!

image


And now, for the quote of the day:


!

Creamy Lemon and Shrimp Orzo Pasta

Yesterday was my daughter’s birthday. On birthdays in our household, the birthday person gets to choose the food that is eaten the WHOLE day! Yes… our family does, at times, revolve around food and meal time. We enjoy eating! So… needless to say, I think we ate out all 3 meals yesterday and cooking was not happening! HA! My little girl LOVES to eat out. We eat out maybe 3 or 4 times a month, so I guess it’s exciting still?? At least she does say she likes my cooking, so still a win.

So I figured I’d make a yummy lunch so that I could post today. This one is delicious too. I’m gonna be full for a few hours on this! No needing a snack this afternoon like usual!

You can make this for a lunch, or have bigger portions for a summery refreshing dinner out on your back porch on a summer evening. Doesn’t that sound delightful? For some reason when I think of lemon and shrimp I think: outdoors, sunshine, summer, hanging out on the porch on my Outdoor Furniture. I eat those two ingredients all times of the year… but this dish just made me think summer. YUM!

wpid-1429378854712.jpg

This makes 3-4 servings

INGREDIENTS

For the shrimp:

  • 1/2 lb. medium shrimp, peeled and deveined
  • Kosher salt and freshly ground black pepper, to taste
  • 1 tablespoon Extra Virgin Olive Oil
  • 1 TB butter
  • 1/2 tsp Garlic Powder
  • dash cayenne pepper

For the Lemony Orzo pasta:

  • 1/4 cup diced onion (about 1/4 of a small yellow onion)
  • 1/2 teaspoon dried oregano
  • 1/2 to 3/4 cup Orzo pasta
  • 1 cups Organic Chicken Broth
  • 1/4 cup water
  • 2 TB lemon juice
  • zest of 1 lemon
  • 1/2 cup frozen peas
  • 2 TB heavy cream
  • 1/4 cup grated Parmesan Cheese
  • 2-3 TB fresh parsley chopped

wpid-1429378760193.jpg

INSTRUCTIONS

  • Preheat oven to 375 degrees F.
  • Season shrimp with salt and pepper, garlic powder and cayenne. Toss with olive oil and place onto a Aluminum Foil
    lined Cookie Sheet (with a lip on each edge, or curve up all edges of the tin foil to catch all of the juice and liquid from the shrimp)
  • Bake shrimp at 375 for 12-15 min, depending on size of shrimp. Make sure white and cooked all the way thru, and pink on the outside. No more transparent parts of the shrimp.
  • While the shrimp is cooking in the oven, heat olive oil in a large Skillet over medium high heat. Add garlic, onion and oregano, and cook, stirring often, until onions have become translucent, about 3-4 minutes. Stir in orzo until lightly browned, about 1-2 minutes. (FYI, IF you do actually have a cast iron skillet, check out this cleaning tool: Cast Iron Cleaner
  • Stir in chicken broth and 1/4 cup water. Bring to a boil; cover, reduce heat and simmer until pasta is cooked through, about 10-12 minutes. Stir in lemon juice and cooked shrimp that you have removed from the oven and set aside. Sprinkle with Parmesan and stir and remove from heat. Add the frozen peas and the cream and stir in.
  • Serve immediately garnished with fresh parsley and a bit of shaved parmesan cheese.

wpid-1429378945602.jpg

Oh me oh my. Soooo good!

Give this one a try for SURE!

And now, for the quote of the day:

YOU MAY BE Pretty, AND YOU MAY BE Talented, BUT NOBODY WILL REMEMBER THAT IF You’re mean. -Katie Holmes

Sundried Tomato Avocado Chicken Sanwiches with Pesto and Mozarella!

I was seriously craving twice baked potatoes. SOOO bad! Alas, my potatoes were VERY sad looking and VERY small. It’s all I had left. I have had a lot of sauteed and roasted veggies for lunches these last couple of weeks and therefore have none for twice baked potatoes. Boo!

Instead, I made a DELICIOUS sandwich on GREAT HARVEST Sourdough. This is significant. It is not significant because I am affiliate of Great Harvest, it’s significant because it’s just simply the best. https://www.greatharvest.com/ I worked at a Great Harvest Bread bakery when I was 15 years old, and I have never tasted bread as wonderful as they make. They have locations all over… so if you’re near one… STOP AND GET BREAD!! 🙂

wpid-1428967215640.jpg

Ingredients

This was for 2 servings

  • 6 chicken tenderloins (or more, depending on how many servings you need)
  • olive oil
  • 2 TB butter
  • Kosher Salt
  • freshly ground Black Pepper
  • Mrs. Dash OR 21 Seasoning Salute
  • 2-3 mozzarella string cheese sticks (OR fresh mozzarella if you have it!)
  • 4 slices of SOURDOUGH bread!!
  • 2-3 TB fresh homemade basil pesto
  • 2 TB diced Sun-Dried Tomatoes
  • Arugula or any type of lettuce for sandwich
  • 1/2 avocado sliced for in sandwich

wpid-1428967118468.jpg

INSTRUCTIONS

  1. Lightly drizzle the chicken breasts with olive oil and season with salt and pepper and the Mrs. Dash or 21 Seasoning Salute.
  2. Sautee in skillet with 1 TB of butter. Cook until white all the way thru and then set aside and let rest.
  3. Place 1 TB of butter into the warmed skillet and let melt on med to low. Butter one side of each of the slices of bread (just like with grilled cheese) and put pesto on the opposite side (from the butter) of 2 slices of bread. This is so that each sandwich will have 1 slice of bread with pesto on 1 side of the sandwich. Place the chicken, sundried tomatoes, and cheese onto the bread and place the other piece of bread on top. “Grill” like grilled cheese until the cheese is melted. (I cut the string cheese in half lengthwise, and then width wise.) Flip over to brown the other side of the sandwich.
  4. Remove from skillet and place onto plate. Remove the side w/out the cheese and place the avocado pieces and the arugula (or lettuce) and put back together. Cut and ENJOY!

wpid-1428967425715.jpg

This sandwich was FULL of flavor. The sourdough definitely was crunchy and the perfect flavor and texture for this sandwich. NO WORDS! Ok… yes, you really have to try Great Harvest! 🙂 The chicken was moist and tender… everything balanced quite well! This is a quick and easy dinner!

I served this with 2 mini sweet potatoes. Aldi has a bag of steamable sweet potatoes that you just pop into the microwave for 8 minutes! I just had the sandwich and sweet potatoes and was quite satisfied! Give this one a try!

And now, for the quote of the day:

"BATTLES ARE FOUGHT IN OUR MINDS EVERY DAY... RESIST negative thoughts... be determined to rise above our problems," Joyce Meyer. "Fear not, for I am with you... I will strengthen you, I will help you, I will uphold you with My righteous right hand," Isaiah 41:10.

Oh, and if you need help waking up in the morning, did you know you can order coffee or k-cups on Amazon and have them delivered for free? You can even sign up for a subscription where it delivers on a schedule. You can even get k-cups for as little as $0.36/k-cup! WHAT?! Seriously!!

Check out this link: 15% off San Francisco Coffee K-cups

Roasted Cauliflower and Bacon over Lemony Zucchini Noodles

Yesterday I did… yard work! Gasp! I know! Those of you who know me would be absolutely SHOCKED!! The last time I did “yard work” I ended up rushing to the local urgent care and getting 10 stitches in one of my fingers. I played it safe this time… I just purchased ferns for my front porch and transferred them (with some help from my brother and hubby) into hanging baskets. Then I filled my “\Window Box” or porch flower boxes with dirt and pretty little flowers that by daughter picked out. My husband was laughing at how little the flowers were for the flower boxes and said that noone is going to know that any flowers are in the box! I am HOPING that they will grow and hang over a bit. My daughter picked them out and was SO excited about it. I figured, who really cares… you know? I’m ok if they never really show to those people walking by my house… I know they are in there! 🙂

So after a hard day (hehehe) doing yard work and I needed to take my ol’ hound dog 🙂 on a bit of a jog. So, my sweet husband took care of the kids and I went for a little jog. Well, my hound dog decided to cut me off mid-jog to smell something on the other side of the path and I rolled my ankle over a tree root and fell pretty hard! Silly dog. It took me a second, but I got back up, finished the, now walk, and got back home to fix some dinner. I feel old this morning though. I only have 2 tiny bruises from this fall, but I feel sore all over. I’m so old.

So, after all of this, I decided to do something carb free and quick. I THINK this took me 30 min or under from start to finish. The most time consuming part of this was making the zucchini noodles. It wasn’t that bad, it’s just that I had to figure out how I wanted to make them. My cheese grater worked the best. I didn’t have a fancy Spiral Vegetable Slicer. Honestly it probably would have been WAY easier, but I wanted to try this recipe with what I already had without buying anything. You can also try a Mandoline. I have one, but I really decided I would use my Cheese Grater because most people already have one of those.

So, here’s the recipe:

wpid-1428585999389.jpg

Ingredients

  • 2 cups cauliflower florets (fresh, not frozen if possible)
  • 2 tablespoon extra virgin olive oil
  • salt and pepper, to taste
  • 1/2 tsp minced garlic
  • 1/4 cup chopped onion – 1/2 small onion (I prefer sweet yellow)
  • 4 pieces of nitrite and nitrate free bacon (I used pre-cooked Trader Joes Bacon)
  • 2 TB unsalted butter
  • 2 medium zucchinis
  • 1 TB homemade pesto (optional) for garnish
  • Shaved parmesan as garnish
  • For the lemon sauce:
  • 1/4 teaspoon lemon zest
  • 1.5 teaspoons lemon juice
  • 1.5 tablespoons grated Parmesan cheese
  • salt and pepper, to taste

wpid-1428585862148.jpg

wpid-1428585917891.jpg

Directions

  1. Preheat the oven to 400 degrees. Line a baking tray with tin foil.
  2. Toss the cauliflower in a medium bowl with the olive oil, and season with salt and pepper. Lay the cauliflower out on the prepared baking tray and roast for 25 minutes or until easily pierced with a fork and lightly browned.
  3. While the cauliflower is roasting, grate the zucchini using the cheese grater (or your “spiralizer” if you have one!)
  4. Place a large skillet over medium heat and coat with 1-2 TB olive oil. Lay in the bacon slices and cook for 3-5 minutes or until crispy. Transfer to a paper towel lined plate and set aside.
  5. After bacon is removed (don’t overcook it, it’ll add a burnt flavor the rest of the dish!)add in your minced garlic, and onions. Cook for 30 seconds or until fragrant and then add in the zucchini noodles. Sprinkle the lemon zest and pour the lemon juice over top of the mixture and stir.
  6. Cook, tossing frequently, for 3-5 minutes or until zucchini noodles are slightly soft, or “al dente”. Add in the butter and stir until melted. Add in the cauliflower and crumble the bacon back in over the skillet, with your fingers. Give a toss and then remove from heat and stir in the Greek yogurt mixture. Toss to combine thoroughly and divide into bowls.
  7. Sprinkle with parmesan and drizzle a bit of pesto (optional) over top for garnish and a bit of extra flavor.

Tip: you NEVER cook pesto. You heat the meal and then add the pesto. Only add the pesto to the amount of food you want to eat. Save the remainder of the pesto with a bit of oil over the top in an airtight Jelly Jar in the refrigerator and the food separately. When you reheat the meal, add the pesto AFTER. If you cook the pesto, it changes color and flavor.

wpid-1428586189919.jpg

This meal was really good! It actually satisfied my craving for pasta, and I didn’t have any!! The zucchini was a little crunchy, but still “noodle-like”. This one was easy and tasty! Give it a try!

And now, for the quote of the day:

Browned Butter and Balsamic Ravioli

Do you ever just browse Pinterest for fun? Do you ever find yourself in trouble because you have gone thru endless pages because of the endless scroll in Pinterest and suddenly it’s been over and hour and your clothes are still not folded? That was me yesterday. I just wanted to check out a couple of other ideas for meals, just in case I saw something new… and an hour passed during precious naptime – when I can actually be productive – and my clothes definitely didn’t get folded. Oh well, there’s always today!!!! Plus, the weather yesterday was beyond beautiful, and we just HAD to spend a lot of the afternoon outside. I knew today was gonna be a bit gloomy… and it is!

One of my favorite chefs to watch on TV is Giada. She has a very good way to cook… she uses REAL ingredients, and just eats smaller portions. I’m still working on the smaller portions thing, but I agree with the using REAL ingredients. Even Dr. Oz has agreed that a lot of the “low fat, fat free, low cal” stuff adds chemicals and things not good for you, instead of you putting just smaller amounts of real food into your body. I try to use wholesome ingredients, as well as filling ingredients. I also try to have lighter and smaller meals throughout the day. Instead of 2 additional BIG meals, I have 3 or 4 small, snack like meals that are light and filling, and a bit higher in fiber and protein to keep me from picking junk food when I’m “STARVING”! 🙂

This dinner is not light in calories, but it IS full of AMAZING flavor! And this one has enough protein that with a smaller portion, you’ll still be satisfied!

My dish is a version of Giada’s recipe here: http://www.foodnetwork.com/recipes/giada-de-laurentiis/ravioli-with-balsamic-brown-butter-recipe.html?soc=sharingpinterest

I changed more than 3 ingredients, so the recipe below is mine, but it was more than inspired by her recipe listed above. 🙂

brownedbutterravioli3

18 to 20 ounces store-bought fresh refrigerated ravioli (cheese, mushroom, or squash) (if frozen, the cooking directions are different)
6 tablespoons unsalted butter
1 tablespoon balsamic vinegar
1 tablespoon white balsamic vinegar
1/2 teaspoon salt
1/4 teaspoon freshly ground black pepper
1/3 cup toasted, chopped walnuts (optional)
2 chicken tenderloins
1/2 tsp garlic powder
2 TB – 1/4 cup white wine for deglazing pan – optional
1/4 cup grated Parmesan

brownbutterravioli

Directions
Bring a large pot of salted water to a boil over high heat. Add the ravioli and cook 4 to 5 minutes, until tender but still firm to the bite, stirring occasionally. Drain ravioli and drizzle with 1-2 tsp olive oil to keep from sticking together. Place onto serving plate, or into a bowl and set aside.

Drizzle 2 TB olive oil into skillet and place the 2 diced chicken tenderloins into the skillet. Sprinkle with garlic powder, and salt and pepper. Cook until no longer pink (5 min approx.) and remove from pan and set aside. Place skillet back on stove and deglaze with the white wine to get all the “yummy bits” off of the bottom of the pan.

Then, cook the butter in that skillet over medium heat, stirring occasionally. When the foam subsides, and the butter begins to turn a golden brown, about 3 minutes, turn off the heat. Let cool for about 1 minute. Stir in the white and regular balsamic vinegar, salt, and pepper.

Transfer the ravioli and the diced chicken to the pan saucepan with the balsamic brown butter. Sprinkle walnuts (optional) and Parmesan over the top. Serve immediately.

brownedbutterravioli2

This one was QUITE delicious! I never would have thought pairing balsamic vinegar and butter would be so delicious, but it REALLY REALLY is!!! Give this one a try for sure!!

And now, for the quote of the day, I picked something I think of daily:

tumblr_m1tbr8C5Wf1rr3l61o1_500

Guest Post: My husband “cooked” me dinner for my birthday!

BBQbuttershrimp

Ok… so I obviously love to cook, but on my birthday, I don’t want to. The problem was, I didn’t want to go out either. I am a homebody and I just wanted to be HOME on my birthday. So, my husband was there with a very big problem. Since we have gotten married he has cooked for me about 5 or 6 times. I am pretty sure he was successful 2 of those times. Sometimes he tries to get too creative. Like when he made me chicken lettuce wraps and wanted them to taste like P.F. Changs… they somehow ended up having noodles and peanut butter in them. “WHAT?” you say? “Peanut Butter in lettuce wraps?!” You say? Yes. That is what he did. That’s just one of his creative examples.

So, what I did for my birthday, INSTEAD of giving him creative control, was asked him to cook WITH me in the kitchen and I’d be his “sous-chef”. (sp?) AND he made me dinner! Definitely a FUN “date” time for us, and I REALLY enjoyed it! We made margaritas and talked, and made dinner. I loved it so much!

So I was at Trader Joes the other day buying shrimp because I can get wild caught shrimp (Red Argentinian shrimp to be precise) for $8.99/lb and they are med.-large size! The guy at the checkout register was telling me about this recipe that he had just tried the night before for shrimp and how amazing it was! So I looked it up on my phone while I was standing there and stored it away so that I could use it later. I then decided later… I wanted it on my birthday! And boy… it’s a good one!

BBQ Butter Shrimp – copy cat Ruth’s Chris Steak House

This is NOT my recipe, or my husband’s recipe… this is literally copied from this link: http://www.food.com/recipe/ruths-chris-steak-house-barbecue-shrimp-orleans-147717

Check it out!!!

TOTAL TIME
12mins
PREP

5 mins

COOK

7 mins

INGREDIENTS

Nutrition

DIRECTIONS

  1. For Barbecue Butter — Soften butter at room temperature to 70-80 degrees F. Place butter in mixing bowl; add pepper, cayenne pepper, paprika, salt, rosemary, garlic, Worcestershire, Tabasco, and water. Whip on high speed 3 minutes or until thoroughly blended. Refrigerate to 40 degrees F. Makes about 2 1/2 cups.
  2. For Shrimp — Toss the shrimp with the ingredients listed above, in a large bowl. Then, place on a lined rimmed cookie sheet (so all the oil and juices won’t spill over into your oven) and bake in a preheated oven at 350 degrees for 10-13 minutes depending on size of shrimp. Cook until pink and no longer translucent inside of the shrimp.
  3. Take care not to overcook the shrimp.

Becky’s Additions: 

I served the shrimp over leftover mashed potatoes!!! We removed the shrimp from the oven, and placed on re-heated mashed potatoes, and then smothered them with the barbecue butter and some shredded cheese and ENJOYED!! It was AWESOME!!!!!! Give it a try!

bbqbuttershrimp2

Spicy Cajun Shrimp Pasta

So… it SNOWED! Woohoo!! Since I homeschooled, it didn’t really matter either way… we still did school today, but my kids got to go out and play in the snow! And yes, it was only a 1/2 inch MAYBE… but look at my daughter’s face…

11001841_10206420643181178_4535765341258850917_n

Priceless!!!

So what’s good for dinner on a cold day? Spicy food!!!! (And pretty much most other warm food… but spicy is on the menu for today!) And you know… I made my own “mild” version of spicy that my husband giggled at a little bit when I called it spicy. But you know, we can’t all be champions of the Taco Bell fire sauce like him, you know. 😉

So here we go:

Spicy Cajun Shrimp Pasta

cajunshrimppasta3

1/2 lb. medium shrimp, peeled and deveined (I used Trader Joes Red Argentinian Shrimp, it’s WILD CAUGHT!)
1 TB EVOO
1 TB unsalted butter
2 tsp minced garlic
1/4 cup sweet yellow onions diced
1/4 cup sweet mini peppers chopped (I used 1 of each color)
2 TB fresh lemon juice, and the zest of 1 lemon
1/4 cup white wine – I used Riesling – use what you like to drink
1 tsp. Worcestershire sauce
1 TB. Cajun seasoning, divided – I used Emeril’s Bayou Blast
1/2 tsp cayenne powder – or more to your spicy preference
1/2 cup shaved Parmesan cheese
8 ounces angel hair pasta, cooked according to package directions
1/2 cup reserved pasta water set aside

cajunshrimppasta

Have pasta precooked and set aside. Angel hair pasta does not take very long to cook. Cook according to the packaging.

Preheat oven to 350. Toss shrimp in 1 TB olive oil, splash white wine, 1 tsp minced garlic and salt and pepper and 1/2 of the cajun seasoning. Put shrimp on cookie sheet lined with tinfoil, put pieces of approximately 1 TB of butter over the shrimp, and place into preheated oven. Bake for 10-12 min (depending on size of shrimp) until cooked thru and pink. If timed right, you will take the shrimp from the oven, and dump into skillet with onions and peppers right as they are cooked through.

Heat 1 TB olive oil  and 1 TB butter in a large nonstick skillet on medium heat. Saute the garlic, onions, and bell peppers, for 3 minutes. Add the lemon juice, zest and Worcestershire sauce, and half of the Cajun seasoning. Add the wine and remaining Cajun seasoning and reduce heat and simmer for another 5 minutes. Add a bit of cayenne powder at this point to spice it up a bit if you’d like to. If too thick, add the 1/2 cup of reserved pasta water at this time. Then, remove shrimp from the oven and place into skillet with all juices and sauce from the pan. Place the pasta into the skillet, and stir to coat well. Top with grated Parmesan cheese and serve!

cajunshrimppasta2

Enjoy being warmed up by this yummy dish!

And now, for the quote of the day:

inspirational-quotes-happy-marriage

Salted Caramel Popcorn

So, my friend had her annual Oscar party last night and I had no idea what to bring. I was trying to bring something that I already had stuff for at home… and I need to go grocery shopping. PLUS my birthday was on Saturday and I had just spent the whole weekend NOT cooking and laying around! HA! So… what to do?!?!?!

I went thru Pinterest like a mad woman! I was looking for an easy recipe that had just a few ingredients that I already had in my cupboard. I couldn’t do “Oscar” shaped cookies, or fancy cheesecake filled strawberries, or bacon wrapped filet etc… lol. It had to be SIMPLE.

And then…. I saw it. Golden – PERFECT color! – warm and easy with just a few ingredients…. Salted Caramel Popcorn! YES!

So I start making it and I realize I do not have brown sugar. So, I being an emotional woman, break down into tears. Yes, tears. It was a sad sight. My husband looked at me very strangely and did what any good husband would do: He went quick to my mom’s house to get me some brown sugar. 🙂

And here it is!

saltedcaramelcorn

I did NOT use my own recipe, I got it off of this great blog that came to me in my time of need! 🙂

http://cookiesandcups.com/salted-caramel-popcorn/

Check it out!

Salted Caramel Popcorn
Makes about 16 cups of caramel corn
 
Ingredients
  • ½ cup unpopped popcorn kernels (about 16 cups popped corn)
  • 1 cup salted butter
  • 1 cup light brown sugar
  • ⅓ cup light corn syrup
  • 1½ – 2 tsp kosher or sea salt, divided
 
Instructions
  1. Preheat oven to 300°
  2. Line a large baking sheet with parchment paper or a silicone mat. Set aside.
  3. Pop popcorn kernels using air popper into a large bowl.
  4. In a small saucepan melt butter, brown sugar, corn syrup and 1 tsp salt together over medium heat. Bring to boil. Boil for 4 minutes without stirring.
  5. Pour caramel mixture over popcorn and stir to coat evenly.
  6. Pour popcorn into lined pan, sprinkle remaining salt on top (1/2 tsp – 1 tsp depending on your personal taste preference) and place in oven. Bake for 30 minutes, stirring every 10 minutes.
  7. Allow popcorn to cool on a parchment lined counter.
saltedcaramelpopcorn2 
Notes
You can add in 2 cups of nuts to the un-coated popcorn if desired! Coat with caramel as states!
– I didn’t follow her recipe exactly because I do not have an air popcorn popper, I have the oil popper. I also do not have parchment paper, so I used sprayed tin foil. AND, I did not have a full pound of butter… so I reduced all of the amounts of the ingredients for the caramel. I also added about 1/2 tsp of vanilla to the caramel mixture. Other than that I followed her recipe and it came out perfectly!!!

ENJOY!

And now, for the quote of the day:

5e30f8665d71b6784d742bcbc02deb7a