Spicy Beans and Rice with Kielbasa

My husband, who has a love of all things Mexican/spicy/taco related… LOVES beans and rice. Especially red beans and rice. I, personally, am kind of picky when it comes to beans. I’m all about a certain texture. Some  beans have a “weirder” texture than others. Black beans are ones that I actually like/tolerate better than others. SO… when I decided to make this dish, I had to swap out a few ingredients… and then I spiced it up a bit! Usually rice and beans is quite mild, but I thought… let’s make it a bit spicy for my hubby! It turned out delicious too! I will give options for those who do NOT want the extra heat in the dish and prefer their beans and rice on the milder side.

This dish… literally… took me 15 minutes to cook. That’s it. Start to finish. 15 minutes, DONE.  My husband took the kids and the dog on a walk, when they got back, dinner was done! That’s not hard, right?! Who needs a processed and prepackaged voila meal when you can make something like this so quickly?! AND you know all of the ingredients and sodium etc. content, because you put it in there! (Except for the kielbasa… but I get the cleanest, most natural kind I can possibly find… and the Turkey version!). So… give this one a try, you busy busy families! You won’t regret it!

wpid-1433806944756.jpg

Servings: 4

Ingredients
  • 1 tablespoon extra virgin olive oil
  • 1 tablespoon unsalted butter
  • 1 package (14 ounce) All Natural Turkey (or regular) kielbasa, sliced
  • 1/2 small sweet yellow onion diced
  • 1 tsp minced garlic
  • 1 cup white rice
  • 1 1/2 to 2 cups water
  • 1 can (14 ounce) black beans, rinsed well
  • 2 mini sweet yellow peppers diced (OR half of a bell pepper)
  • 1/8 tsp cayenne powder (SKIP if you want MILD rice and beans)
  • 1/2 tsp cajun seasoning like: Emeril’s Bayou Blast (IF you want MILD, try using 1/4 tsp of turmeric!! Beautiful color and MILD taste!)
  • 1/2 tsp smoked paprika
  • 1 can of fire roasted diced tomatoes with green chilis (Rotel or similar) — for mild, use the diced tomatoes w/out the chilis
  • salt and pepper, to taste

wpid-1433806875365.jpg

Directions
  1. Start the rice in a pan or the rice cooker. RINSE your rise until the water runs clear. I use a mesh colander. Place the rice into a pan, or rice cooker, and fill until the water covers the rice and rises to the first crease on your finger if you are BARELY touching the top of the rice…. Make sense?? If not, follow the directions on the bag. 🙂 Press COOK on the rice cooker if you have one… and move on. Otherwise, follow rice instructions on the bag.
  2. In a large nonstick skillet, heat the oil and butter over medium-high. Add the kielbasa and onion; sauté until onions become soft and translucent (about 3 minutes), stirring occasionally. Add in the garlic, beans and peppers and stir for about 30 seconds.
  3. Stir in the cooked rice and a dash of salt and pepper. Stir until well incorporated.
  4. Serve immediately and enjoy!

wpid-1433807019185.jpg

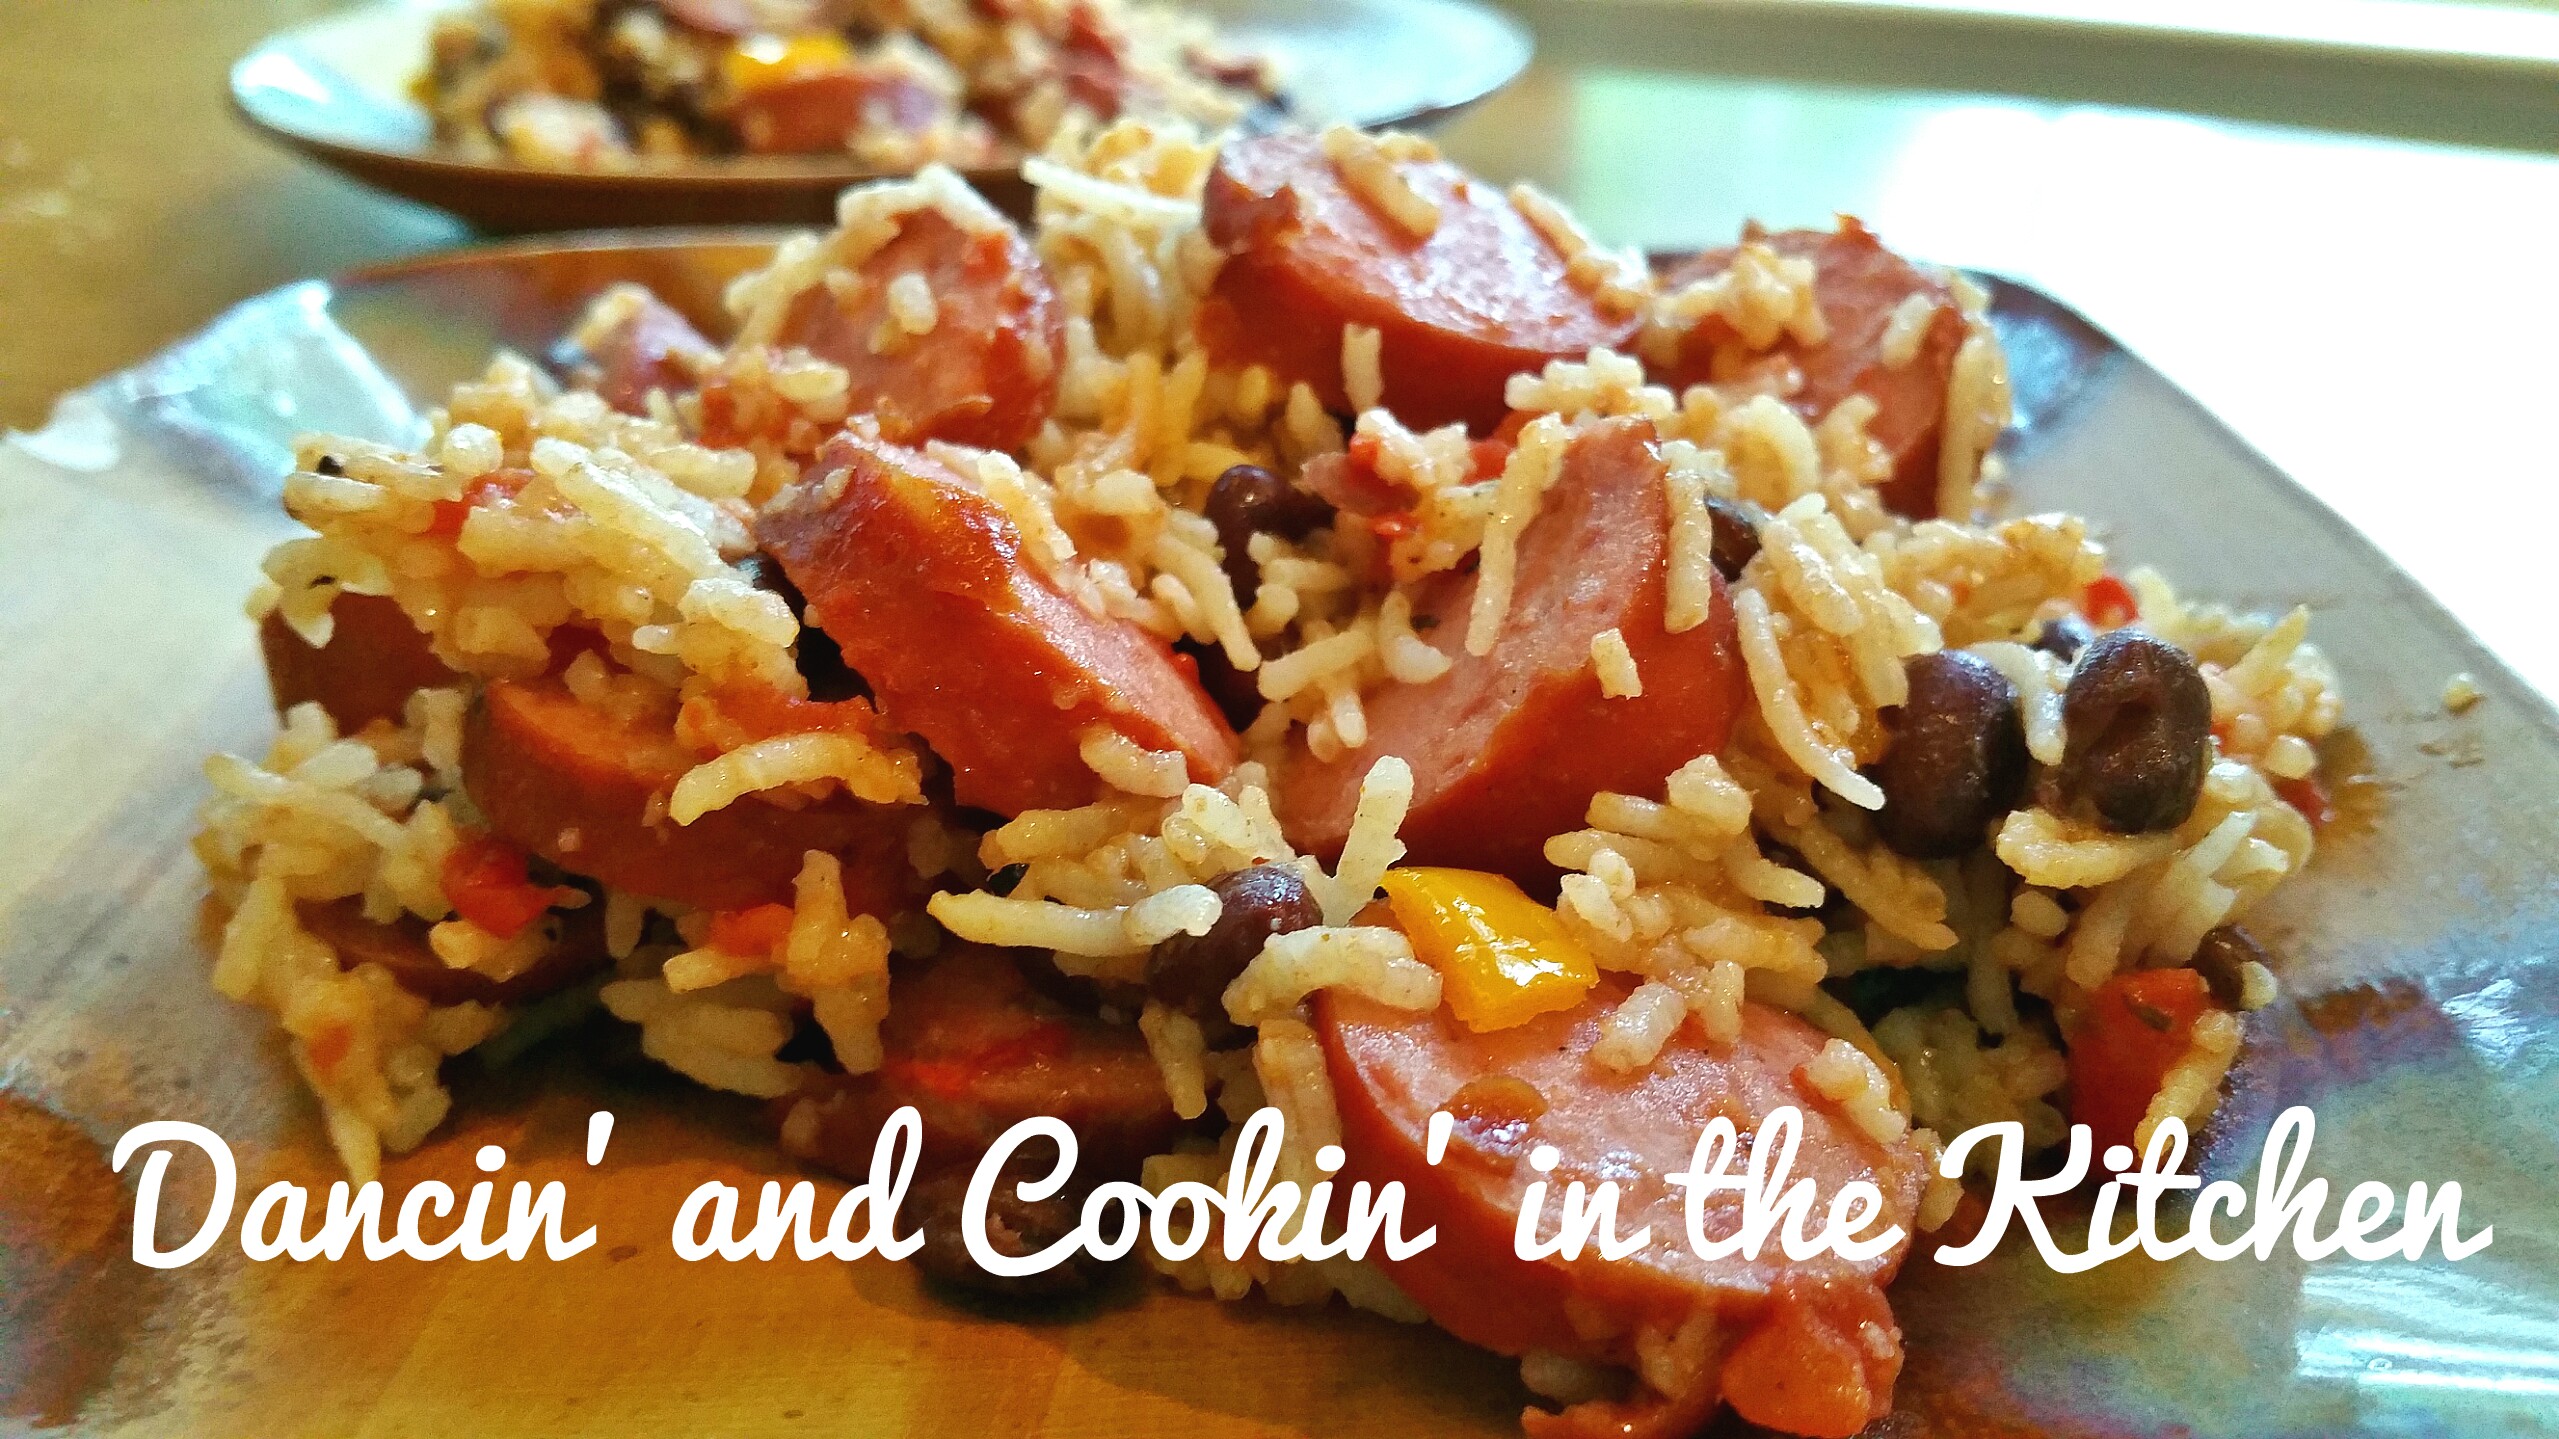
This was full of heat, and flavor, and makes my mouth water thinking about it!!

YUM! The leftovers definitely were enjoyed!!

And now, for the quote of the day:

The Dalai Lama has a Message for You. {13 Quotes to Steer your Life by} | elephant journal

BBQ Shredded Chicken and Potato … bake… nachos?

I really don’t know what to call this! I may go back in a few days and change the name and edit it… but in this moment, I don’t know. I basically had leftover crock pot shredded BBQ chicken (which I will give my recipe for, because it turned out AMAZING!) and then I added a bunch of other ingredients that sounded AMAZING and kind of like nachos…. but not. Ha! Also, I baked it, and I have since decided, it needs to be cooked on the stove top. I make skillet veggies almost every day for lunch and when I use potatoes, they always end up nice and tender. These potatoes in the dish were not soft within the time period that I baked it! It was annoying! So… I will give my recipe, with notes on how to either make it in the oven long enough to have the potatoes be nice and tender… as well as how to make it on the stove top.
So… here goes!

image

This is for 4 servings

Ingredients:

3/4 cup Pulled BBQ Chicken
      – 8 chicken thighs, 1 bottle of your.      favorite BBQ sauce (I used Sweet Baby  Ray’s Original), 1/2 cup dark brown sugar, 1 TB Worcestershire sauce, 1/2 cup chicken broth, salt and pepper to taste. Cook in crock pot on low for 8 hours, or high for 4 to 5 hours. When finished, shred with a fork, and SAVE THOSE LEFTOVERS! 🙂
1/2 can natural black olives, sliced
2 yukon gold potatoes, washed and diced
1/2 cup shredded Mexican cheese
1/2 can black beans RINSED
2 TB your favorite salsa (I used black bean and corn TJ salsa)
1/2 cup frozen corn
1 avocado sliced
Garnish: sour cream
Optional: corn chips or tortillas for eating!

image

Directions:

To bake:
Preheat the oven to 400 degrees. Placed diced potatoes and shredded chicken and salsa into a glass baking dish (8×8 will work) and drizzle with 1 TB olive oil. Bake for 25 minutes  (OR until potatoes are soft!). Then, remove pan from oven and add the remaining ingredients, stir around, ending with the cheese (do NOT put the avocado on until you serve… add as a garnish). Bake for an additional 10 to 12 minutes, until it’s hot and bubbly!
Serve as a burrito on a tortilla, or in a bowl with some chips like a nacho dip!

On the stove top:
Melt 1 TB butter in a large skillet (12 inch probably). Place potatoes and salsa into the skillet and cook on medium high until potatoes start to soften. Add the BBQ chicken, and stir well. Add more BBQ sauce if needed. Add the corn, black olives, and black beans and stir until cooked thru. Turn heat off and top with cheese. Let cheese melt… you can place lid on until cheese melt to speed up the process. Serve immediately topped with a bit of avocado and sour cream!

image

I honestly wasn’t sure I was gonna blog this because it didn’t turn out perfectly and it was basically ingredients I thought to myself : that would be good together… so I put it together. … nothing gourmet or well thought out. But then my husband said he LOVED the leftovers. I also realized that some of the best recipes come from random ingredients thrown together. I hope this inspires all of you out there to experiment! Even if it fails, you tried something new and you were creative in the kitchen! Win!

And now, for the quote of the day:

image

Chicken and Summer Vegetable Coconut Curry Over Whole Grain Quinoa

Curry…. I honestly never thought I liked curry. It’s not always the prettiest dish honestly. I also always thought that it had to be spicy… I never knew that it could be quite mild! This is now my 3rd posted curry recipe on my blog! I have found that I just love it! (Mainly when I can control the spiciness that is!) I even will put turmeric in my veggies for lunch sometimes… it adds that pretty yellow color and just the right amount of taste!

This dish cooked up quite quickly! Like usual, I used my rice cooker to make my quinoa… so if you don’t have one yet… you know you want one! 🙂

wpid-1433444643381.jpg

This will make 4 medium sized servings

INGREDIENTS

1/4 cup chopped onion
3 tsp curry powder
1/8 tsp turmeric
1/2 tsp minced garlic
1/4 tsp smoked paprika
2 carrots, peeled and diced
1 large yukon gold potato peeled and cubed into bite size pieces
2 medium zucchini squash, diced
1 small yellow summer squash
Small handful of green beans chopped into bite size pieces
1 15oz can of unsweetened premium coconut milk (NOT Light!!!)
3/4 cup chicken broth
1 large bunch of kale (or spinach) rinsed and chopped (remove center vein from the kale)
Salt and pepper to taste
2 tablespoons olive oil
1 TB butter

Quinoa:

1 cup quinoa
2 cups water
1 TB olive oil
dash of salt

wpid-1433444543326.jpg

INSTRUCTIONS:

Start by starting the quinoa. RINSE your quinoa in a metal mesh colander, or SOMEHOW. But definitely rinse it. Then, either measure and place into a rice cooker and press “cook”, or follow directions on the package and cook in a small sauce pan with a lid.

Then, cook your chicken. I used 3 chicken tenderloins so that the dish would vegetable heavy with a hint of chicken… not the other way around! I placed butter in the bottom of the skillet, and turned it onto medium to melt the butter. Then, I put my chicken tenderloins into the skillet onto the melted butter. I added the 1/2 of the onion and 1 tsp of the curry powder and salt and pepper. While it’s cooking, I took the spatula and cut the chicken into bite sized pieces. (I cook my chicken from frozen, so if you cook from raw, feel free to cut into bit sized pieces first.) Once the chicken is cooked through, remove the chicken from the skillet and place in a bowl and set aside. Add the olive oil into the still warm skillet still at medium heat. Add the potatoes and carrots first with the chicken broth. Add the rest of the curry powder, paprika, minced garlic and turmeric. Once they have cooked for 5-7 minutes and veggies start to soften (as well as the chicken broth cooking down and reducing a bit) add the zucchini, summer squash, green beans. Shake the can of coconut milk well to mix. Open the can and stir coconut milk in slowly to the vegetable mixture. I only ended up using 3/4 of the can of coconut milk, but you may want to use all of it. Just depends on how you like it. Add the chicken back into the mixture and stir to incorporate it. Let it simmer a couple of minutes. Add salt and pepper to taste. Just before you are ready to serve it, add the rinsed and chopped kale. Stir, combine, and SERVE over the cooked quinoa. DELICIOUS!!!

wpid-1433444728133.jpg

Even the leftovers of this dish was AMAZING! If you like curry, try it! You can even add a bit more spice if you’d like, throw a bit of cayenne powder for a bit more spice! 🙂

And now, for the quote of the day:

Sauteed Summer Veggies and Bacon over Cheese Grits

Leftovers… seems to be the theme this week! I guess that’s not a bad thing, right?! Who wants to throw out the leftover bits of food in their fridge? Not me! I like to try to use it here and there before it goes bad! I freeze a lot of leftovers so I have time to use it. Sometimes on the weekend I copy what my mom used to do. I remember, when growing up, we used to have 1 day a week where all of the leftovers would come out of the fridge or freezer, be heated up, and that was our lunch or dinner. We didn’t want to waste good food! So these past few recipes have been me using up food from previous recipes this month. Works well!

This one I actually made for lunch! And I was able to whip it up really quick since I used leftovers!!

wpid-1433187233156.jpg


Ingredients:

3/4 to 1 cup of leftover (or fresh!) cheesy corn grits (or leftover polenta!)
1 small zucchini
1 large carrot
1 piece of bacon
handful of chopped baby spinach
1-2 TB unsalted butter
salt and pepper to taste
optional topping of parmesan cheese
1 TB chopped onion (I used some leftover onion I had storing in my freezer)


wpid-1433187162886.jpg


Directions:

Start out by chopping your carrots, and zucchini. Melt the butter in a skillet over medium heat. Add your zucchini and carrots first. After they start to cook, add the onions and bacon and let the onions caramelize. While this is cooking, heat up your grits, either by cooking from scratch, or if you have leftovers  you add 2-3 TB of water (because the grits absorbs all of the liquid when it’s stored in the fridge) and microwave for 1-2 minutes until it is smooth and creamy again. Place the grits into a small bowl or onto a small plate and set aside. At the last minute, when the veggies are slightly browned, but still have a bit of a crunch, toss the chopped spinach into the pan and let just slightly wilt. Pour the veggies over the grits and add parmesan cheese if so desired and serve (or eat!) immediately! Enjoy!

wpid-1433187294467.jpg

This dish is bright, colorful, crunchy, creamy and filling! Give this quick dish a try today!

And now, for the quote of the day:

#inspirational #quotes

Quick Leftovers Chicken Quesadilla

I’m continuing in this post with using up my leftovers. I used some leftover chicken that I had (you can even use leftover rotisserie chicken for this!!!) This was quick, easy, everything grabbed last minute and MAYBE took 15 minutes! After a busy and crazy day, what’s better than that?! It’s also kid friendly!

wpid-1433106723977.jpg

I served this with some chips and salsa… you could also serve it with some spinach or some sour cream and salsa to dip it in. It’s actually quite versatile!

This is for 2 quesadillas… just double, triple etc for more!

Ingredients:

2 flour (or corn… or wheat for that matter!) tortillas
1/4 lb of diced of shredded chicken (already cooked)
2 pieces of cooked bacon – chopped
1/2 sliced avocado
3/4 to 1 cup shredded cheddar cheese
1/4 cup diced sweet mini peppers (or 1/2 bell pepper chopped)
2-3 TB chopped sweet yellow onion
optional: a few sundried tomato pieces! You can add it in there, or use fresh tomatoes, either would be good!
optional: spinach or a bit of hot sauce

wpid-1433106648063.jpg

Directions:

Start of by dicing and slicing your veggies. Get your avocado out and slice 1/2. What I do, is slice the whole thing, and ten place the 1/2 that I don’t use in a baggie (pre-sliced and not in the shell) into the freezer that I can pull out later and use in smoothies). Once all of your veggies are cut, you can pull out your chicken and bacon. I used leftovers. If you do not have leftovers, but still want to make this, just quick cook it up in a bit of olive oil with salt and pepper. I usually use pre-cooked bacon and cook it quickly in the microwave and then crumble it up.

But 1/2 TB in the bottom of the skillet and let it melt and medium to medium low temp on the stove. Once melted, place 1 of the tortillas on the skillet. Cover with desired amount of cheese, then place half of chicken, then the veggies, and ending with the avocado. Fold over the tortilla and let it brown for a minute or two, then flip it over with a large spatula. Let it continue to cook for 2-3 minutes, until the cheese is melted and starting to ooze out the side. Remove from skillet and place on a plate, and repeat with the 2nd tortilla. I usually cut each quesadilla in 2-4 pieces with a pizza cutter. Serve with some salsa, maybe some sour cream, and enjoy!!!!

wpid-1433106808742.jpg

And now, for the quote of the day:

But the Lord stood by me and strengthened me, so that through me the message might be fully proclaimed and all might hear it. So I was rescued from the lion’s mouth. The Lord will rescue me from every evil deed and bring me safely into his heavenly kingdom. To him be the glory forever and ever. Amen. 2 Timothy‬ ‭4‬:‭17-18‬

Spicy Shrimp and Andouille Sausage Over Corn Cheesy Grits

I’ve been missing blogging! This last week after traveling, my grocery budget was VERY small, and we ate A LOT of leftovers. Sometimes that happens! Gotta clear out what we’ve got in the freezer and pantry. I am so thankful that we have that luxury too. So thankful!

So after using up a lot of leftovers I got to start fresh with my food planning! I did have a couple of things to finish up though: Andouille sausage and a bit of shrimp. I thought… why not combine those?? What can I put those on to make a filling and delicious dinner… because those 2 things by themselves, or even together isn’t quite filling enough… THEN, I found a bag of corn grits in my freezer! Voila! Dinner!

So, this dish doesn’t take that long at all, 30 min start to finish and dinner is on the table!

wpid-1433020626301.jpg

This serves 3-4 people (depending on size of servings)

Ingredients:

2 “links” andouille sausage (they usually come in a pack of 4. If it comes in a large single link, you could use just half… or use all of it and double the remainder of the recipe) sliced into “medallions” or small bite size pieces
1/2 pound of shrimp
3 cups chicken broth
1 cup corn grits
3/4 cup shredded cheddar or the mexican blend cheese
3-4 TB butter
1 TB olive oil
2 tsp cajun seasoning
salt and pepper to taste

wpid-1433020480887.jpg

You want to start by preheating your oven to 375 degrees (do not use convection if your oven has that option). Then, pour your chicken broth into a sauce pan and bring to a boil. Add your corn grits and cook to the directions on the packaging.

Once the grits have started, take the shrimp (I bake them from frozen) and place them onto a foil lined baking sheet. Make sure that if your baking sheet doesn’t have raised sides, to make your tin foil have the sides up to make sure none of the juices spill over in your oven. Lay the shrimp out onto the foil in a single layer, drizzle with olive oil and then sprinkle the cajun seasoning generously over the shrimp and make sure they are evenly covered. Dot the tops with a bit of the butter (about 1 of the TB) and place into the oven and bake for 12-13 min (depending on the size of your shrimp).

When the grits are close to finished (usually takes 25 to 30 minutes for a thick and creamy consistency) and you are about to take the shrimp out of the oven, drizzle about 1 Tb olive oil into a skillet and place the andouille sausage into the heated oil in the pan. Cook until hot all the way thru and a bit browned.

When the grits are done, remove them from the heat and add 1-2 TB butter, and 1/2 cup of cheese and stir until incorporated. Add salt and pepper to taste. Serve the grits immediately and top with some of the shrimp and sausage. Garnish with a sprinkle of cheese over top each bowl and enjoy the spicy flavorful heat!!!

wpid-1433020574427.jpg

As much as I usually don’t like anything spicy… this was SOOO GOOD! I didn’t think I liked grits either… but if this is what they are supposed to taste like, I’m sold! YUM!

Try this one for a spicy, warm, comforting dinner that’ll fill you right up!

And now, for the quote of the day:

❤️

Homemade Wheat Sandwich Bread (with a #vegan option!)

So, we spend a lot of money on bread around our house. Like, it’s ridiculous. Because of my son with food allergies, I am very picky about what brand and what ingredients are in the bread. We have been buying bread from Trader Joes for about $4.00 per loaf (or more… can’t quite remember) because I like the ingredients, and it doesn’t have any allergens in it. But… that much money per loaf and I buy 6 loaves of bread every 2 weeks… that’s a LOT of money for bread! So, I’ve decided I need to make more of my own bread. My mom has a bread machine that I can use… but I don’t like my bread BAKED in the bread machine. So, I make the dough in the bread machine, and then bake the bread in the oven. This recipe came out PERFECT! It’s got a nice crispy crust with a soft and slightly doughy inside… DELICIOUS! I don’t want to buy bread again! My mom also had some FRESHLY GROUND wheat flour. Like, not store bought… she had Wheat Berries, ground them in her Grain Mill, and gave it to me! WHAT?! Yes!!!!! Freshest you can get! I used half of this fresh flour, and half of the all purpose flour (I use Lily Flour…. I also have used King Arthur).

wpid-1432126065429.jpg

Doesn’t that look delicious!!??

For 1 loaf, so double for a batch of 2.

Whole Wheat Bread

Ingredients

1 1/4 cup warm water (NOT hot! You don’t want to “kill” the yeast)
2 tsp pure cane sugar (organic is preferred)
2 tsp fresh squeezed lemon juice
2 TB local honey
2 tablespoons butter , melted (you can use Earth Balance for the VEGAN option!)
3/4 tsp kosher sea salt
1 1/2 cups whole wheat flour
1 1/2 cups unbleached all-purpose flour, plus possible extra White Lily All Purpose Flour

3/4 TB bread machine yeast

wpid-1432125904391.jpg

IF you have a bread maker this will be quite easy! If not… BORROW ONE!! HA! It just makes it soo much easier! If you WANT one, check out this awesome and ON SALE breadmaker: Cuisinart Breadmaker

Load your bread maker in the order the ingredients are listed. Wet ingredients first, and ending with the bread machine yeast. Then, set to the DOUGH cycle. Do NOT select a bread cycle. You want dough only. Mine was a 1 hour and 20 minute cycle. When the bread machine is kneading the dough, I watch it to make sure it’s only slightly sticky, but still is being kneaded around by the machine and not sticking to one side of the pan. If needed add 1 TB of all purpose flour at a time until it’s just SLIGHTLY sticky… but not too dry! If it’s too dry, add 1 tsp of water at a time. Get a bread pan (glass or aluminum, didn’t matter… I tried both) and grease it either with a bit of butter, or cooking spray and set the bread pan aside.

Once the timer goes off and your dough is done, butter up your hands… or flour them… 🙂 … so that the dough doesn’t stick to your hands when you take it out. Remove the dough (it will deflate, that’s fine!) and make sure the paddle of the bread machine does not stay in the dough! Kind of knead it down a bit, and shape into a rounded rectangle. Place into greased bread pan and then set a damp kitchen towel over top and allow to rise for 30 minutes. At this time, preheat your oven to 350 degrees F.

wpid-1432125953735.jpg

wpid-1432125990298.jpg

After 30 minutes, the bread dough should have doubled in size. Remove the towel, and place into the preheated oven and bake at 350 for 30 minutes. It should be golden brown with a nice crispy crust and chewy moist bread inside!

I cut it right away and me and my 2 kids ate a nice thick slice just dripping in melted butter… OH MAN!! It was DELICIOUS!!!

If you would like some homemade bread… give this one a try! It’s the best recipe I have ever made for homemade sandwich bread! And believe me, I’ve tried MANY!

wpid-1432126120745.jpg

And now, for the quote of the day:

If the world were to come to an end today and all of the people who believed in the Lord our God as their Savior were taken to Heaven to be with Him for eternity… do you know for sure if you would be with them?!

Revelation 21:4- the incredible hope and promise that can only Jesus Christ can provide!!!

Cajun Seared Salmon topped with a Simple Guacamole

I always forget how simple and easy fish is to make. I just always have to remember to thaw it properly in enough time for dinner! Ha! Luckily, yesterday, I remembered to put the frozen salmon into the fridge to slowly thaw the fish! I then ran it under WARM (not hot) water just before I cooked it while it was still in the vacuum sealed pack… just to finish the thawing. Once that was done… Dinner really took 20 minutes. Start to finish. How lovely is that?! Even if you work full time and need something quick to eat when you come home, this is a great answer! Serve this over a bit of rice, orzo pasta…. with some chips or… as is! I ate this with a few corn chips, and it was the perfect and filling dinner! I couldn’t even finish my portion of the salmon! DELISH though!

Salmon and a Simple Guacamole

image

INGREDIENTS

1-2 lbs salmon (I did 2 salmon steaks of sockeye salmon – wild caught)
1 TB olive oil (I used light extra virgin olive oil)
1 tsp salt
2 tsp Emeril’s Bayou Blast Cajun seasoning
2 TB butter
1 tsp black pepper
2 TB lemon juice

For the Simple Guacamole:

1 avocado, sliced
1 green onion diced
Juice from 1/2 of lemon
1/2 cup frozen corn (or fresh) slightly heated up and set aside
Salt and pepper to taste
2 TB chopped fresh parsley

image

INSTRUCTIONS

Drizzle the olive oil over the salmon and rub the Cajun seasoning over and into the top of each salmon steaks. Place in fridge until ready to cook. Preheat oven to 350 degrees.
Place the cast-iron grill pan onto the stove and heat to medium-high. Salt the grill pan lightly.
Combine the avocado, green onion, parsley, lemon juice, corn and salt and pepper in a bowl and mix well, chill until ready to use.
Grill the salmon skin side down on grill pan for 4 to 5 minutes. Top the salmon with pieces of the butter and the lemon juice and place into preheated oven (still on cast iron grill pan… make sure yours is oven safe!) And bake for 5-10 minutes to desired doneness. It really depends on the thickness of the salmon steaks. (I baked them for approximately 8 minutes.)
Top with some of the simple guacamole and enjoy!

image

And now, for the quote of the day:

image

Oven Roasted Broccoli and Spicy Shrimp

So, I haven’t posted in a while… we very spontaneously went out of town to visit my husband’s grandfather. We have been asking him if we could visit him for a while and he would always come up with a reason we couldn’t visit: hurricane season, ebola… etc. You get the gist. Well, my hubby was talking to him and he said we could come and visit, but only of we came before June 1st (hurricane season)! So… we packed up and drove 8 hours and spent the weekend with him! He is 95, and we felt like… you never know how many more visits we will be able to make, so we went down to visit him! I did cook quite a bit while I was down there, but did not document any of it… but these are a couple of dishes I made before and after the trip!

Oven Roasted Broccoli and Spicy Shrimp

image

Ingredients:

1/2 lb peeled and deveined wild Caught Shrimp (I used TJ Argentinian Red Shrimp)
2 TB unsalted butter
1-2 cups frozen (or fresh) broccoli
1/4 tsp Himalayan sea salt
1/4 tsp fresh ground pepper
Drizzle of olive oil
1/2 tsp Cajun seasoning (Emeril’s Bayou Blast is great!)
1 TB lemon juice drizzled over top
Parmesan cheese if desired

image

Directions:

Preheat the oven to 375 degrees. Line a baking sheet (that has a raised lip… like a cookie sheet) with tin foil and either grease with a bit of butter or cooking spray. Put raw shrimp and broccoli in a bowl and toss with the ingredients until well coated. Spread so there is a single layer out on the baking sheet. Place in oven for 12 to 15 minutes until shrimp is cooked thru and no longer translucent, but also not over cooked. Remove and squeeze a bit of lemon juice over top and serve immediately.

Enjoy! This one is a quick and easy filling dinner. Serve it over rice, as is, or with a bit of fruit! This one was delicious!

And now, for the quote of the day:

image

Oven Roasted Sausage and Potatoes

This dish was definitely easy! You do have to have 30-45 minutes to bake/roast it… but it is completely worth it! Just a little chopping and peeling, a bit of stirring and you’ve got a filling and hearty meal that the whole family will LOVE! You could even use these same ingredients and put them in foil packets and toss them on the grill for a quick and easy meal as well! Either way it will turn out delicous!

image

Oven Roasted Sausage and Potatoes
Serves 4

1 package of nitrite/nitrate free turkey kielbasa or smokes sausage
1/2 large yellow sweet onion, peeled and chopped
3 large yukon gold, peeled and chopped into 1/2 inch cubes
2 large sweet potatoes peeled and chopped into 1/2 inch cubes
olive oil
fine sea salt
freshly ground black pepper
1/4 tsp smoked paprika
1/2 tsp. dried thyme
1/2 tsp dried dill
1/2 tsp dried oregano
1-2 TB butter
a handful of grated strong cheddar cheese or parmesan cheese

image

Preheat the oven to 400 degrees F. Spray cooking spray on a large 9×13 baking pan (casserole dish) or thinly coat with a bit of butter. Set aside.

Put the sausage rounds, onions and potatoes into a large bowl. Drizzle with a couple turns of olive oil and season to taste with salt, pepper, paprika, dill, oregano (and even a dash of cayenne powder for a bit of spice if you’d like!) and dried thyme. Toss together with until everything is evenly distributed. Pour this out into the baking dish, and spread it out as much as you can. Top with small pieces of the butter evenly across the top (optional) for nicely browned potatoes.

Place into the heated oven and roast for 45 minutes to an hour, stirring every 15 minutes or so, until the potatoes are golden brown and tender. Turn off the oven. Scatter the cheese over top of the cooked meat and potatoes, Pop back into the oven a few minutes to melt the cheese. Serve immediately.

NOTE:  I would not use any more than 1/2 tsp of the dried thyme, unless you really, really like the flavour of thyme.

image

Enjoy!

And now, for the quote of the day:

image