“7 Layer Salad” … or Taco Salad…

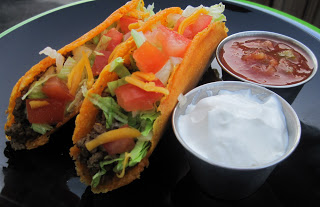
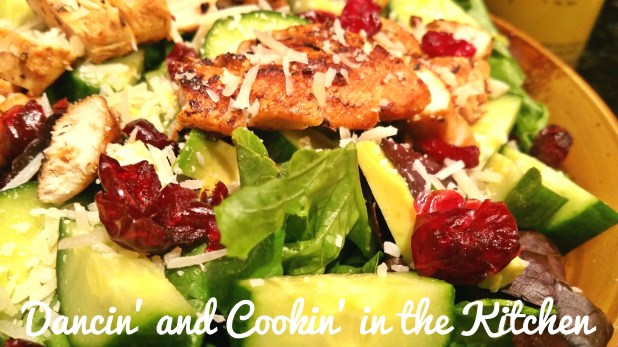
My daughter asked for tacos again. Ha. She’s obviously her father’s daughter. She ate GREAT tonight. Me, I wanted to make something that was using the same ingredients, but using less carbs. So… I saw this salad, or “7 layer dip”.. although I can’t see using this as a dip honestly. I also should have put this into a clear bowl so that all the layers could have been seen from the outside when I took pictures. It was quite pretty to be honest! And, as I was about to take a picture it fell… and I was so sad!

But… this is a DELICIOUS salad, or … dip… but it’s a bit messy. That’s ok though. It makes up for the messiness and lack of being a “pretty” dish with flavor. That’s all that’s really important anyway!

wpid-1429574447285.jpg

Ingredients

  • 4 cups chopped romaine lettuce
  • 1 avocado sliced
  • 2 tbsp lemon juice
  • salt and pepper to taste
  • 1/4 tsp garlic powder
  • 1/2 lb. grass fed ground beef (85/15)
  • 1/2 cup PLAIN Greek Yogurt
  • 1/2 cup shredded mexican cheese
  • 1 tomato sliced and diced
  • taco seasoning
  • 1 can of black beans
  • 1 can of black olives, sliced
  • 8 oz cheddar cheese
  • 1/2 cup of salsa

wpid-1429574538009.jpg

Directions

Start by cooking the ground beef through until there is no longer any pink. Drain the fat. Then, add the taco seasoning and the amount of water said on the back of the taco seasoning packet. (If you use homemade taco seasoning, it’s about 1/2 to 2/3 cup of water). Stir until well incorporated. Add 1/2 of the black beans to the hamburger meat.

Next chop the lettuce, black olives, tomatoes and the avocado. Place the avocado in a small bowl and add the lemon juice, salt and pepper and the garlic powder. Stir and set aside.

Starting with the lettuce on the bottom of a bowl, add each layer on top of the next, ending with sprinkling the cheese on top. I then drizzled salsa over top.

You can eat this as a salad, like I did… crunch a few chips over top to still get a few chips and crunch in without eating as many chips as you would have if you ate the whole thing with chips… or… go for it and just eat it with scoops chips! Delicious either way right?!

wpid-1429574609939.jpg

See, a delicious, messy and just a #getinmybelly moment!!! 🙂 ENJOY!!!

And now, for the quote of the day:

Hang on

Creamy Lemon and Shrimp Orzo Pasta

Yesterday was my daughter’s birthday. On birthdays in our household, the birthday person gets to choose the food that is eaten the WHOLE day! Yes… our family does, at times, revolve around food and meal time. We enjoy eating! So… needless to say, I think we ate out all 3 meals yesterday and cooking was not happening! HA! My little girl LOVES to eat out. We eat out maybe 3 or 4 times a month, so I guess it’s exciting still?? At least she does say she likes my cooking, so still a win.

So I figured I’d make a yummy lunch so that I could post today. This one is delicious too. I’m gonna be full for a few hours on this! No needing a snack this afternoon like usual!

You can make this for a lunch, or have bigger portions for a summery refreshing dinner out on your back porch on a summer evening. Doesn’t that sound delightful? For some reason when I think of lemon and shrimp I think: outdoors, sunshine, summer, hanging out on the porch on my Outdoor Furniture. I eat those two ingredients all times of the year… but this dish just made me think summer. YUM!

wpid-1429378854712.jpg

This makes 3-4 servings

INGREDIENTS

For the shrimp:

  • 1/2 lb. medium shrimp, peeled and deveined
  • Kosher salt and freshly ground black pepper, to taste
  • 1 tablespoon Extra Virgin Olive Oil
  • 1 TB butter
  • 1/2 tsp Garlic Powder
  • dash cayenne pepper

For the Lemony Orzo pasta:

  • 1/4 cup diced onion (about 1/4 of a small yellow onion)
  • 1/2 teaspoon dried oregano
  • 1/2 to 3/4 cup Orzo pasta
  • 1 cups Organic Chicken Broth
  • 1/4 cup water
  • 2 TB lemon juice
  • zest of 1 lemon
  • 1/2 cup frozen peas
  • 2 TB heavy cream
  • 1/4 cup grated Parmesan Cheese
  • 2-3 TB fresh parsley chopped

wpid-1429378760193.jpg

INSTRUCTIONS

  • Preheat oven to 375 degrees F.
  • Season shrimp with salt and pepper, garlic powder and cayenne. Toss with olive oil and place onto a Aluminum Foil
    lined Cookie Sheet (with a lip on each edge, or curve up all edges of the tin foil to catch all of the juice and liquid from the shrimp)
  • Bake shrimp at 375 for 12-15 min, depending on size of shrimp. Make sure white and cooked all the way thru, and pink on the outside. No more transparent parts of the shrimp.
  • While the shrimp is cooking in the oven, heat olive oil in a large Skillet over medium high heat. Add garlic, onion and oregano, and cook, stirring often, until onions have become translucent, about 3-4 minutes. Stir in orzo until lightly browned, about 1-2 minutes. (FYI, IF you do actually have a cast iron skillet, check out this cleaning tool: Cast Iron Cleaner
  • Stir in chicken broth and 1/4 cup water. Bring to a boil; cover, reduce heat and simmer until pasta is cooked through, about 10-12 minutes. Stir in lemon juice and cooked shrimp that you have removed from the oven and set aside. Sprinkle with Parmesan and stir and remove from heat. Add the frozen peas and the cream and stir in.
  • Serve immediately garnished with fresh parsley and a bit of shaved parmesan cheese.

wpid-1429378945602.jpg

Oh me oh my. Soooo good!

Give this one a try for SURE!

And now, for the quote of the day:

YOU MAY BE Pretty, AND YOU MAY BE Talented, BUT NOBODY WILL REMEMBER THAT IF You’re mean. -Katie Holmes

Comfort Food: Beef Stroganoff

It was rainy and cold today. I guess I should specify that “cold” was like 57 degrees, but still. So, I felt like eating comfort food. It has been about 4 days since I had pasta (which I think, besides when I did the South Beach Diet before my wedding, it’s the longest I’ve ever gone without having pasta!). So, I saw a recipe for Beef Stroganoff and I was absolutely craving it! It looked so delicious!

Earlier today we had one of my friends and her little baby come over. Don’t you just love the smell of babies? This sweet girl also very obviously loved her mommy. I so desperately wanted to take pictures of her sweet face, and every time she saw her mommy, she smiled REALLY big and put her face in her hands! Precious right? Hard to get a picture though… have a few cute blurs though! 🙂 So while she was over it was rainy and cruddy all morning. Luckily we were ok with being inside. But it definitely put me in the mood for one of my planned meals: Beef Stroganoff. So, here it is!

wpid-1429230775525.jpg

Ingredients

3-4 servings

Inspired by: http://www.foodnetwork.com/recipes/ree-drummond/beef-stroganoff.html?soc=socialsharingpinterest&oc=linkback
Buttered Egg Noodles:
8 ounces Egg Noodles
1 tablespoons salted butter

Beef Stroganoff:
2 tablespoons olive oil
1 TB butter
1/2 tsp minced garlic
1 pound top sirloin steak, cut into small cubes
Salt and freshly ground black pepper
2 carrots, finely chopped
1/2 onion, finely chopped
1/4 cup red wine (your favorite) **optional
2 1/4 cups beef stock
2 tablespoons Corn Starch
1/4 cup FULL FAT Greek Yogurt PLAIN
Chopped fresh parsley, for serving

wpid-1429230708966.jpgDirections
For the buttered egg noodles: Bring a large pot of water to a boil. Add the egg noodles and cook according to the package instructions. Drain and set aside.

For the beef stroganoff: Heat 1 tablespoon butter in a skillet over medium-high heat. Season the meat with salt and pepper. Add half the meat to the pan and brown it quickly (but don’t quite cook through). Remove the first batch and cook the rest of the meat. Remove and set aside with the first batch.

Add the olive oil to the skillet and cook the carrots, garlic and onions until lightly browned. Turn off the heat and add the wine and 2 cups of the beef stock. Turn the heat back on and reduce the liquid for 2 to 3 minutes. Mix the cornstarch with the remaining 1/4 cup stock, getting out all the lumps. Pour the slurry into the skillet and cook until the sauce thickens.

Turn off the heat. Stir in the sour cream, and beef. Taste and adjust the seasoning with salt and pepper.

To finish the noodles, melt the butter in a skillet over medium heat. Add the cooked egg noodles and toss to heat through and coat with the butter.

Serve the stroganoff with the noodles, and sprinkle with the parsley.

wpid-1429230825084.jpgThis seriously hit the spot. Rainy day? Want a filling and enjoyable meal made with whole and fresh ingredients? THIS IS IT! Delicious, seriously. I would have eaten more if I wasn’t so full. I had to keep myself out of the skillet with the leftovers. I, personally, am allergic to mushrooms… so if you notice that my Beef Stroganoff does not have any mushrooms… it’s because that was intentional. If you look at the original recipe, hers does. FYI. 🙂

And now, for the quote of the day:

One of the most SIMPLE and DOWN-TO-EARTH EXPLANATION of ministry that qualifies all of us.

Meal Planning

Do you meal plan?

I do every 2 weeks. I like to plan ahead. I don’t plan what meals are going to be for what nights or anything… but I plan and shop for 10 dinners (sometimes 1 or 2 extra recipes that have similar ingredients to others that I’ve shopped for in case I change my mind) and then I shop for lunches and breakfasts etc for those 2 weeks at a time.

That is why a lot of the things I talk about I say “thaw”. I don’t usually buy and then cook meat the next day. I don’t usually buy fresh and cook THAT day. It’s very rare that that happens. I don’t like to run to the grocery store every day. I’ve got kids… kids that are impatient and don’t love the grocery store. I personally don’t like the germs that come with the touching of the shopping carts!  Ew.

So, every 2 weeks I’ve got my pinterest board that I go thru, delete the ones I’ve already made my own, and re-pin ideas for the next couple of weeks.

Here is my weekly planning board: https://www.pinterest.com/rebeccacain23/weekly-meal-plans/

If you don’t like the online route for meal planning, you can go the route of a paper pad: Knock Knock What to Eat Pad

OR a magnetic white board for your fridge! I’ve done this in the past! Magnetic Meal Planner

My husband and I also just started using the app: “Out of Milk”. You can scan the UPC code on some items so that it can be REALLY specific if you husband needs to pick something up for you! You can specify store, items, how many, average price, and whether or not you have a coupon for it. It also gives you an alert for whats on sale in the area! It’s a very helpful app, and I have it open as I shop so that I only buy what I planned to purchase. It helps keep me from purchasing anything impulsively!

Also, have you ever heard of Mvelopes? There are 2 versions. There is the cash version, and the debit card all online version. The online version, at www.mvelopes.com has a free version and it tracks all of your swipes on your debit cards and credit cards! It helps you budget and track your spending. It will even give you a graph that shows you percentages of where you spend your money! Crazy huh? We took a Dave Ramsey course at our church and it was recommended. I’d say check it out if you’re looking for something to help figure out where all that $$ is going! 🙂

Tonight my husband is still not home and it’s 8p. Sometimes he gets home early, and sometimes he gets home late! I did not feel like cooking a big whole dinner just for myself.. and also did not feel like making dinner at 8p. So, tomorrow is the day a recipe will come!

So, how do you meal plan? What are your tools?? Or, do you just wing it at the grocery store?? Let me know!

And now, for the quote of the day:

C.S. Lewis

Taco Tuesday!

So it’s Tuesday and my husband requested… what else… tacos! HA!

So, since THAT isn’t a new recipe, I’m going to post ideas, tips, thoughts and pics of ideas for Taco Tuesdays for you!

Low Carb Taco Tuesday:

http://lusciouslowcarb.blogspot.com/2010/10/its-taco-night.html

She used CHEESE for her taco shells! Check out her blog!

And… have you SEEN these?! We have some. As many tacos as we eat in our house, these are a necessity!

They are: TacoProper Taco Holder

Hysterical huh??

Ok… this one Rasta Imposta Taco I’ve gotta consider getting John for no reason… hahahahahaha!

Or this book… a TACO cookbook!!! Tacolicious: Festive Recipes for Tacos, Snacks, Cocktails, and More

As far as tips go, I’d have to say… why not have a “Taco Tuesday” and a “Macaroni Monday” and a “Wings Wednesday” etc… At least occasionally. It’s easier on the cook, and fun for the people eating! Traditions are a PLUS and also something to look forward to. Maybe the first week of each month, or quarter you can have a “Spirit Week” where it’s a themed dinner meal. How easy to plan for that huh??

So… that’s the post for today! I promise tomorrow will be WAY more recipe like… I’m shopping tomorrow!! WOOHOO!

IF you have any recipe requests, ideas, or want me to makeover or under a recipe… let me know in the comments or send me a quick email!!

Sundried Tomato Avocado Chicken Sanwiches with Pesto and Mozarella!

I was seriously craving twice baked potatoes. SOOO bad! Alas, my potatoes were VERY sad looking and VERY small. It’s all I had left. I have had a lot of sauteed and roasted veggies for lunches these last couple of weeks and therefore have none for twice baked potatoes. Boo!

Instead, I made a DELICIOUS sandwich on GREAT HARVEST Sourdough. This is significant. It is not significant because I am affiliate of Great Harvest, it’s significant because it’s just simply the best. https://www.greatharvest.com/ I worked at a Great Harvest Bread bakery when I was 15 years old, and I have never tasted bread as wonderful as they make. They have locations all over… so if you’re near one… STOP AND GET BREAD!! 🙂

wpid-1428967215640.jpg

Ingredients

This was for 2 servings

  • 6 chicken tenderloins (or more, depending on how many servings you need)
  • olive oil
  • 2 TB butter
  • Kosher Salt
  • freshly ground Black Pepper
  • Mrs. Dash OR 21 Seasoning Salute
  • 2-3 mozzarella string cheese sticks (OR fresh mozzarella if you have it!)
  • 4 slices of SOURDOUGH bread!!
  • 2-3 TB fresh homemade basil pesto
  • 2 TB diced Sun-Dried Tomatoes
  • Arugula or any type of lettuce for sandwich
  • 1/2 avocado sliced for in sandwich

wpid-1428967118468.jpg

INSTRUCTIONS

  1. Lightly drizzle the chicken breasts with olive oil and season with salt and pepper and the Mrs. Dash or 21 Seasoning Salute.
  2. Sautee in skillet with 1 TB of butter. Cook until white all the way thru and then set aside and let rest.
  3. Place 1 TB of butter into the warmed skillet and let melt on med to low. Butter one side of each of the slices of bread (just like with grilled cheese) and put pesto on the opposite side (from the butter) of 2 slices of bread. This is so that each sandwich will have 1 slice of bread with pesto on 1 side of the sandwich. Place the chicken, sundried tomatoes, and cheese onto the bread and place the other piece of bread on top. “Grill” like grilled cheese until the cheese is melted. (I cut the string cheese in half lengthwise, and then width wise.) Flip over to brown the other side of the sandwich.
  4. Remove from skillet and place onto plate. Remove the side w/out the cheese and place the avocado pieces and the arugula (or lettuce) and put back together. Cut and ENJOY!

wpid-1428967425715.jpg

This sandwich was FULL of flavor. The sourdough definitely was crunchy and the perfect flavor and texture for this sandwich. NO WORDS! Ok… yes, you really have to try Great Harvest! 🙂 The chicken was moist and tender… everything balanced quite well! This is a quick and easy dinner!

I served this with 2 mini sweet potatoes. Aldi has a bag of steamable sweet potatoes that you just pop into the microwave for 8 minutes! I just had the sandwich and sweet potatoes and was quite satisfied! Give this one a try!

And now, for the quote of the day:

"BATTLES ARE FOUGHT IN OUR MINDS EVERY DAY... RESIST negative thoughts... be determined to rise above our problems," Joyce Meyer. "Fear not, for I am with you... I will strengthen you, I will help you, I will uphold you with My righteous right hand," Isaiah 41:10.

Oh, and if you need help waking up in the morning, did you know you can order coffee or k-cups on Amazon and have them delivered for free? You can even sign up for a subscription where it delivers on a schedule. You can even get k-cups for as little as $0.36/k-cup! WHAT?! Seriously!!

Check out this link: 15% off San Francisco Coffee K-cups

Tropical Coconut Crusted MahiMahi with Coconut Lemon Rice

I am still learning how to cook fish. Each fish type is a bit different. You cook salmon differently than you would mahimahi. You make tilapia differently than you do mahimahi. All different textures and thicknesses. So, for me, it’s a bit hard to take the time and effort to master each one. I am getting closer with salmon… SO CLOSE!! 🙂

This recipe… MASTERED MahiMahi! I’m telling you, it’s AMAZING! If you follow it closely, you will be quite happy with how it turned out! IF you love coconut that is. 🙂 Seriously… tropical and fresh, flaxy and tender… this is an awesome recipe!

I was inspired by this recipe: http://www.bubblews.com/news/788347-coconut-crusted-mahi-mahi-recipe

I changed a few things, so the recipe below is mine, but the inspiration DEFINITELY came from the recipe above!

wpid-1428629645141.jpg

Ingredients:

1/2 cup of bread crumbs (I used 2 pieces of dried whole grain bread and blended in my NutriBullet)
3/4 cup of Sweetened Flaked Coconut
1 teaspoon of finely zested lemon zest
1 tablespoon of fresh lemon juice
3 tablespoons of olive oil
4 (6 oz.) mahi mahi fillets
Sea salt and freshly ground black pepper

Ingredients for Coconut Rice:

1 cup rinsed White Jasmine Rice
1 can light coconut milk
2 tsp fresh lemon juice
salt and pepper

wpid-1428629369817.jpg wpid-1428629428495.jpg

Instructions:

Rice:

Place rinsed jasmine rice into a Rice Cooker and then pour the can of Light Coconut Milk over the rice and let cook. Will just switch to warm when it is done. When the rice is done, put it into a large glass bowl and add the lemon juice and salt and pepper and toss to coat. Set aside covered to keep warm waiting to serve with the fish.

Fish:

Preheat the oven to 425 degrees F. and then line a baking sheet with Aluminum Foil and spray it with cooking spray. You can use a Cooking Spray Mister.

If you do not have Panko Bread crumbs, or other PLAIN breadcrumbs, you can do as I did. I took 2 dried pieces of whole wheat bread, placed it into my nutribullet, and ground it into crumbs! Worked perfectly!! You can also use a Food Processor or a Blender.

Now take a small glass bowl and add in your bread crumbs, coconut, lemon zest,  and lemon juice and whisk your ingredients together. Then drizzle 2 tablespoons of your olive oil over your coconut mixture and mix the olive oil into your ingredients. Set this aside for use later.

You now want to liberally seasoning both sides your mahi mahi filets with your salt and pepper.

Now place your mahi mahi on your prepared baking sheet and place them into your preheated oven and bake for 5 minutes. After 5 minutes remove your baking sheet from the oven and drizzle 1 tablespoon of olive oil over your mahi mahi fillets. Then divide your coconut mixture between your fillets and cover the entire top of each fillet with your mixture. This will create a wonderful crust when baked. Now return your baking sheet to your oven and bake until golden brown and your fish can flake easily with a fork. This should take an additional 10 minutes.

Then remove your coconut crusted mahi mahi from the oven and let them rest for 5 minutes before serving.

Serve over rice and with a veggie.

wpid-1428629483477.jpg

wpid-1428629695295.jpg

You will TRULY enjoy this! My husband gave it the gold seal and said that he’d order this at a restaurant and then go back for more! It’s seriously  one of the best recipes for MahiMahi I’ve ever had!!!! I will definitely be making this one again.

And now, for the quote of the day:

31e6ea871a81730607c281d983d251c7

Roasted Cauliflower and Bacon over Lemony Zucchini Noodles

Yesterday I did… yard work! Gasp! I know! Those of you who know me would be absolutely SHOCKED!! The last time I did “yard work” I ended up rushing to the local urgent care and getting 10 stitches in one of my fingers. I played it safe this time… I just purchased ferns for my front porch and transferred them (with some help from my brother and hubby) into hanging baskets. Then I filled my “\Window Box” or porch flower boxes with dirt and pretty little flowers that by daughter picked out. My husband was laughing at how little the flowers were for the flower boxes and said that noone is going to know that any flowers are in the box! I am HOPING that they will grow and hang over a bit. My daughter picked them out and was SO excited about it. I figured, who really cares… you know? I’m ok if they never really show to those people walking by my house… I know they are in there! 🙂

So after a hard day (hehehe) doing yard work and I needed to take my ol’ hound dog 🙂 on a bit of a jog. So, my sweet husband took care of the kids and I went for a little jog. Well, my hound dog decided to cut me off mid-jog to smell something on the other side of the path and I rolled my ankle over a tree root and fell pretty hard! Silly dog. It took me a second, but I got back up, finished the, now walk, and got back home to fix some dinner. I feel old this morning though. I only have 2 tiny bruises from this fall, but I feel sore all over. I’m so old.

So, after all of this, I decided to do something carb free and quick. I THINK this took me 30 min or under from start to finish. The most time consuming part of this was making the zucchini noodles. It wasn’t that bad, it’s just that I had to figure out how I wanted to make them. My cheese grater worked the best. I didn’t have a fancy Spiral Vegetable Slicer. Honestly it probably would have been WAY easier, but I wanted to try this recipe with what I already had without buying anything. You can also try a Mandoline. I have one, but I really decided I would use my Cheese Grater because most people already have one of those.

So, here’s the recipe:

wpid-1428585999389.jpg

Ingredients

  • 2 cups cauliflower florets (fresh, not frozen if possible)
  • 2 tablespoon extra virgin olive oil
  • salt and pepper, to taste
  • 1/2 tsp minced garlic
  • 1/4 cup chopped onion – 1/2 small onion (I prefer sweet yellow)
  • 4 pieces of nitrite and nitrate free bacon (I used pre-cooked Trader Joes Bacon)
  • 2 TB unsalted butter
  • 2 medium zucchinis
  • 1 TB homemade pesto (optional) for garnish
  • Shaved parmesan as garnish
  • For the lemon sauce:
  • 1/4 teaspoon lemon zest
  • 1.5 teaspoons lemon juice
  • 1.5 tablespoons grated Parmesan cheese
  • salt and pepper, to taste

wpid-1428585862148.jpg

wpid-1428585917891.jpg

Directions

  1. Preheat the oven to 400 degrees. Line a baking tray with tin foil.
  2. Toss the cauliflower in a medium bowl with the olive oil, and season with salt and pepper. Lay the cauliflower out on the prepared baking tray and roast for 25 minutes or until easily pierced with a fork and lightly browned.
  3. While the cauliflower is roasting, grate the zucchini using the cheese grater (or your “spiralizer” if you have one!)
  4. Place a large skillet over medium heat and coat with 1-2 TB olive oil. Lay in the bacon slices and cook for 3-5 minutes or until crispy. Transfer to a paper towel lined plate and set aside.
  5. After bacon is removed (don’t overcook it, it’ll add a burnt flavor the rest of the dish!)add in your minced garlic, and onions. Cook for 30 seconds or until fragrant and then add in the zucchini noodles. Sprinkle the lemon zest and pour the lemon juice over top of the mixture and stir.
  6. Cook, tossing frequently, for 3-5 minutes or until zucchini noodles are slightly soft, or “al dente”. Add in the butter and stir until melted. Add in the cauliflower and crumble the bacon back in over the skillet, with your fingers. Give a toss and then remove from heat and stir in the Greek yogurt mixture. Toss to combine thoroughly and divide into bowls.
  7. Sprinkle with parmesan and drizzle a bit of pesto (optional) over top for garnish and a bit of extra flavor.

Tip: you NEVER cook pesto. You heat the meal and then add the pesto. Only add the pesto to the amount of food you want to eat. Save the remainder of the pesto with a bit of oil over the top in an airtight Jelly Jar in the refrigerator and the food separately. When you reheat the meal, add the pesto AFTER. If you cook the pesto, it changes color and flavor.

wpid-1428586189919.jpg

This meal was really good! It actually satisfied my craving for pasta, and I didn’t have any!! The zucchini was a little crunchy, but still “noodle-like”. This one was easy and tasty! Give it a try!

And now, for the quote of the day:

Lemon-Dill Salmon Over Buttery Pasta with Peas and Spinach

I’ve been trying to perfect salmon for a WHILE. Like, a serious while. I can’t quite get it perfect, but I’m getting there!!!

I have definitely learned to not attempt to cook it from frozen. Always thaw it. Ha. Should be obvious, but I like to try shortcuts. 🙂

I have also learned, yesterday, that it’s hard to cook it perfectly while paying attention to it when you have two little kids. Most likely, on that day, your three year old will run into the kitchen with blood pouring out of his lip while he is scream-crying with your 5 year old girl running after him (also crying) screaming “I didn’t do it on purpose!”. Yes, that happened last night while I was trying to perfectly cook my salmon. Let’s say that it was ALMOST perfect! Pretty good huh??!!! I was proud of that accomplishment after such a “traumatic” incident. He was fine by the way… his big sister just bopped him… hopefully it really was “by accident”.

So, luckily at that time, the salmon had JUST gone into the oven to finish, and my pasta was done and was “marinating” in the butter. So, if I can do it, YOU CAN TOO!! 😉

Try this one out if you like Salmon!!

wpid-1428501908180.jpg

This is for 2 servings

Ingredients:

  • 1/2 tso kosher salt
  • 2 medium salmon steaks (filets)
  • 1 tsp minced garlic
  • 1TB olive oil
  • 3 TB butter
  • 1/2 lb. farfalle (bowtie) pasta
  • 1 large handful of baby spinach rough chopped
  • 1 cup frozen peas
  • Juice and zest of 1 lemon
  • 1/2 tsp fresh or dried Dill Weed (I used dried)
  • 1 Tb parmesan cheese
  • splash of white wine for cooking and deglazing the pan

wpid-1428501408393.jpg

Instructions

  • Preheat oven to 350F.
  • Meanwhile, if you’re using whole grain pasta, cook it in water according to package directions.
  • Drizzle olive oil in an oven safe skillet like mine or Oven Safe Chef’s Classic Skillet and heat to medium.
  • Place salmon steaks skin side down into the hot skillet to get a nice crispy skin.
  • Top the salmon with salt, pepper, lemon zest, lemon juice, minced garlic and the dill.
  • Place the butter into the pan with the salmon and melt. (Put skillet onto medium low – 3, and melt butter).
  • Put a splash of white wine into pan if desired.
  • Spoon the butter/lemon/wine sauce over the salmon for 2 minutes and then place pan with the salmon in it directly into the oven. (Which is why you need to have an oven safe pan shown in the link above or similar).
  • Bake for 6-8 minutes depending on the thickness of your salmon. Remove the salmon from the oven BEFORE the white albumin starts to ooze out. It’s not fun to have on your salmon. REMEMBER TO USE A HOT PAD  WHEN YOU REMOVE IT!! Once the salmon is removed from the oven, remove salmon from pan and SAVE the sauce. Place the salmon onto a plate and let sit for 5-7 minutes.
  • Transfer the noodles and peas into the butter sauce remaining in your skillet and toss to coat.
  • Sprinkle with parmesan cheese and garnish with dill.
  • Serve into bowls.
  • You can either leave the salmon steak whole, or you can “shred” it with your fork and disperse it throughout the dish as I did below.
  • ENJOY!! This one is a winner!!

wpid-1428502145990.jpg

And now, for the quote of the day:

Most won't think this belongs here, but emotions can run hot sometimes and peaceful protests can get out of hand. So this is an important thing to remember, for everyone involved.

Mixed Greens Chicken Avocado Salad with Lemon Poppy-seed Dressing

Mondays…. I made this salad last night. You know the movie “Office Space”?

[​IMG]

I seriously LOVE that movie. I really do. I’ve seen it quite a few times, and it’s still funny every time!

I was thinking about that quote yesterday. The day seemed endless. In South Carolina, there is a yellow haze of pollen floating through the air, and coating my throat and lungs causing swelling and coughing and overall miserable feelings in our house. What is the need for this much pollen? I mean, you look outside and you can SEE THE BREEZE. I’m not joking. We have enough pine trees. The pollen needs to dial it back a bit.

I know this rant will do nothing. But I felt the need to whine. And then I had a glass of wine. HA!

Anyways… back to my salad. My husband said that he was craving his chinese food leftovers last night and wanted to eat that, and was going to be coming home late. I, however, was NOT craving that. So… I looked at my meal plan and decided on a yummy and filling salad!

This one is seriously soo good! I did have popcorn later that evening as a nighttime snack, but this one was filling, sweet yet tangy, and really fresh. You have your crunch, chewy, sweet, tart… everything!

Try this one out for sure!

wpid-1428421276620.jpg

Ingredients

Dressing
    • 1/4 cup olive oil
    • 1/4 cup canola oil (or any light oil)
    • 2 tsp lemon zest
    • 1/4 cup fresh lemon juice
    • 2 Tbsp honey
    • 2 tsp spicy brown mustard, OR dijon mustard
    • 1/4 tsp salt
    • dash of fresh ground pepper
    • 2 tsp poppy seeds (or more if you desire)
  • Mix it in a 2 cup measuring cup with a whisk, or you can mix it in a Salad Dressing Mixer.

wpid-1428421345004.jpg

Salad
  • 4-6 chicken tenderloins cooked (or leftover grilled chicken on a Cast Iron Pan) thru and sliced. (I cooked mine in the skillet with a bit of olive oil, oregano and salt and pepper. The more basic the chicken, the better. You’re gonna have the flavor in the salad and the dressing)
  • 5 oz baby spinach
  • 5 oz. Artisan salad mix (or spring greens)
  • 1 avocado, cored and diced
  • 1/2 cup shaved or grated parmesan cheese
  • 1 sliced and halved cucumber (I prefer English or “hothouse” cucumbers)
  • 1/2 cup dried cranberries
  • Optional: You can add some almonds or pecans as well if you’d like!!!

wpid-1428421404763.jpg

ENJOY!!!!!!

And now, for the quote of the day:

one of my all time favorite quotes